How to Design a PostgreSQL Schema Visually (Step-by-Step)
For a developer starting a new PostgreSQL database who would rather draw the tables than write every CREATE TABLE by hand.
On this page
A new PostgreSQL database starts empty, and the tables you need exist only as a list on a page. Designing the schema takes five steps, and you can do each one in SQL or draw it in DbSchema, which then writes the SQL for you:
- Create a schema for the application.
- Add the tables, each with its column types and a primary key.
- Connect the tables with foreign keys.
- Describe the tables and columns.
- Save the design, deploy it to PostgreSQL, and share it.
What a schema is in PostgreSQL
A PostgreSQL database contains one or more named schemas, and each schema holds tables along with other named objects such as data types and functions. The same table name can exist in two schemas without conflict, so a schema works as a namespace: you reach a table by its qualified name, the schema name and the table name separated by a dot. Naming the schema after the application keeps its objects together, and one statement creates it:
CREATE SCHEMA school;

In DbSchema, the design can start before any database exists. The Design from Scratch entry on the Welcome Screen creates a model with no connection, and it is a Pro feature. The model has to target PostgreSQL, so that the data types DbSchema offers and the SQL it writes match the engine; the RDBMS field under Model, then Model Properties, sets it.
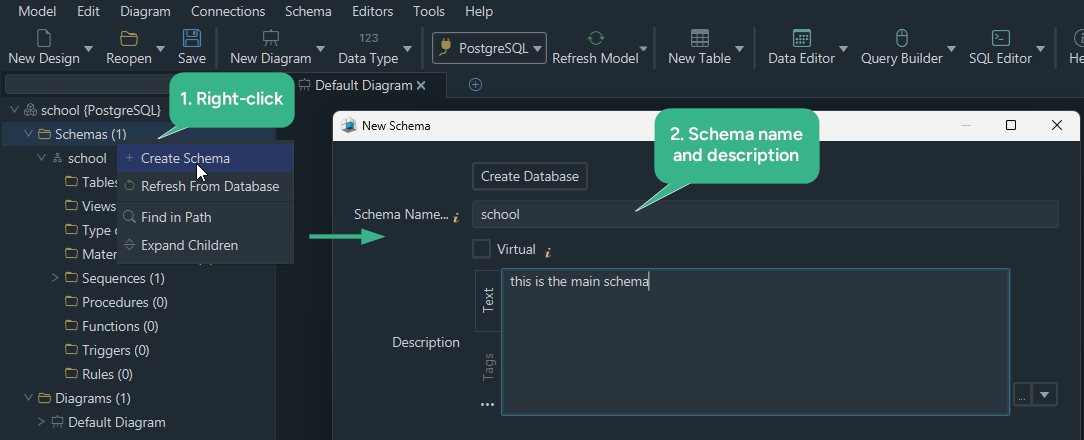
DbSchema lists the model's schemas in the tree panel on the left. Right-click the Schemas folder there to add school with a name and an optional description. To see which schemas an existing database already has, list them with a query.
Write the first two tables in SQL
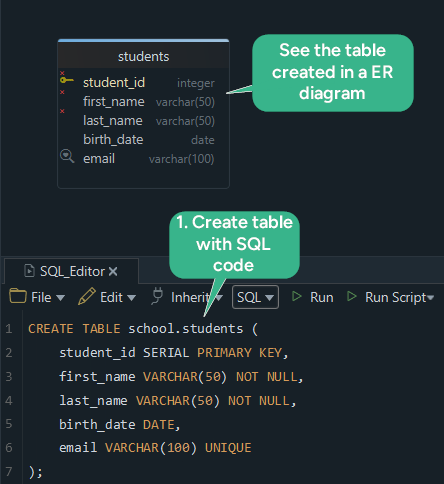
Two of the three tables are quicker to type than to draw, because their columns are already decided. Run both statements in the DbSchema SQL Editor while you are connected, and they execute against PostgreSQL at once:
CREATE TABLE school.students (
    student_id SERIAL PRIMARY KEY,
    first_name VARCHAR(50) NOT NULL,
    last_name VARCHAR(50) NOT NULL,
    birth_date DATE,
    email VARCHAR(100) UNIQUE
);

CREATE TABLE school.enrollments (
    student_id      INTEGER NOT NULL,
    course_id       INTEGER NOT NULL,
    enrollment_date DATE,
    PRIMARY KEY (student_id, course_id)
);
Four types carry both tables:
| type | stores | used for |
|---|---|---|
SERIAL | an integer filled from a sequence on every insert | student_id |
INTEGER | a whole number from -2147483648 to +2147483647 | both columns of the enrollments key |
VARCHAR(n) | text of up to n characters | the names and email |
DATE | a calendar date without a time | birth_date, enrollment_date |
SERIAL is not a real type. The PostgreSQL manual calls it a notational convenience: the column becomes an integer with a sequence behind it and a NOT NULL constraint, so student_id fills itself on every insert. It does not make the column unique; the PRIMARY KEY does that. The SQL-standard form of the same numbering is an identity column, student_id INTEGER GENERATED ALWAYS AS IDENTITY PRIMARY KEY, and it refuses an id typed by hand unless the INSERT says OVERRIDING SYSTEM VALUE. If nothing but PostgreSQL should ever assign an id, that refusal is the reason to prefer it.
enrollments has no id of its own. A student takes a course once, so the pair of student_id and course_id is the primary key, and PostgreSQL refuses the same pair twice. After each statement, DbSchema draws the new table on the diagram with its columns, their types and a key icon on the primary key.
Why the table names carry the schema name
Without a schema name, PostgreSQL looks for a table along the search path, a list of schemas it tries in order. A new database has one schema, public, and the default path is this:
SHOW search_path;
| search_path |
|---|
| "$user", public |
"$user" stands for a schema named after the role you logged in with, and PostgreSQL skips it when there is none. So an unqualified name reaches only public, where the school tables are not:
SELECT * FROM students;
ERROR:  relation "students" does not exist
LINE 1: SELECT * FROM students;
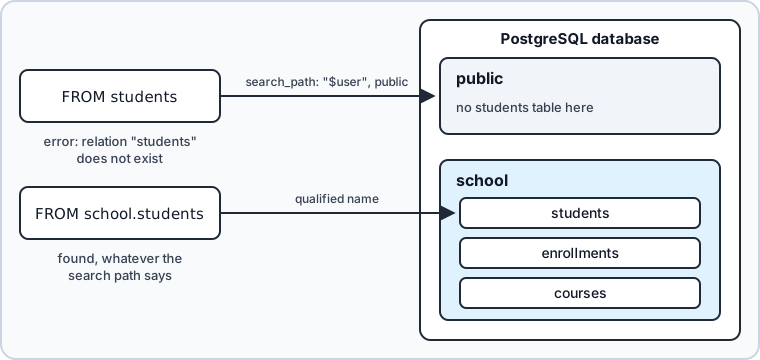
Writing school.students skips the lookup, whatever the path says. The other fix is to put the schema on the path for the session, after which the short names work:
SET search_path TO school, public;
SELECT count(*) FROM students;
| count |
|---|
| 0 |
The path also decides where an unqualified CREATE TABLE lands: in the first schema on the path that exists, which by default is public. That is how tables end up in public by accident, and qualifying every name in the design removes the question.
Draw the third table on the diagram
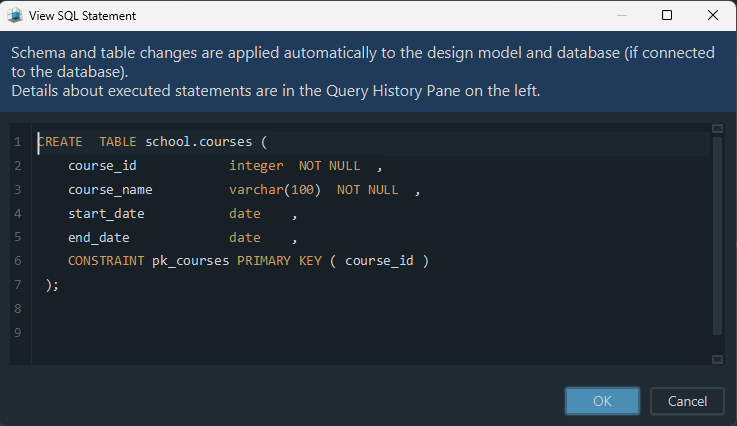
The third table is the one to draw. Drawn, it comes out as this statement, which is the SQL DbSchema generated for it:
CREATE TABLE school.courses (
    course_id   integer      NOT NULL,
    course_name varchar(100) NOT NULL,
    start_date  date,
    end_date    date,
    CONSTRAINT pk_courses PRIMARY KEY ( course_id )
);
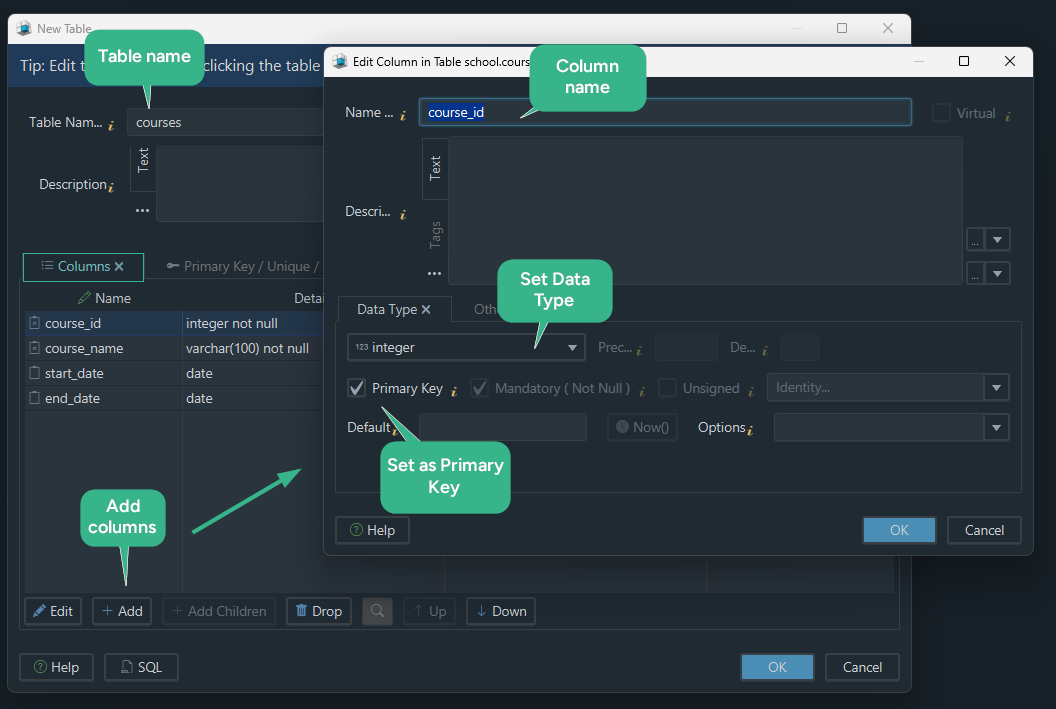
To draw it:
- Right-click the diagram canvas and choose New Table.
- Type
coursesas the table name. - On the Columns tab of the Table Dialog, add
course_id,course_name,start_dateandend_date, each with its type. - Mark
course_idas the primary key, and click OK.
While DbSchema is connected, it runs the statement in PostgreSQL as you make the change and lists it in the SQL History pane on the left. course_id has no sequence behind it: a new course needs its id typed in, unless you give the column an identity in its settings.
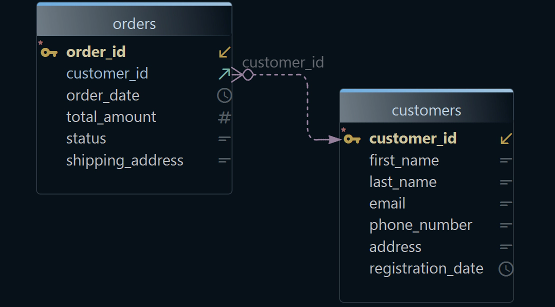
Drawing is worth the mouse work once there are more than a handful of tables. One picture holds every table, the type of every column, the key icons and the lines between the tables, and you can move the tables until the connections read clearly. Creating ER diagrams for PostgreSQL covers the diagram itself in more depth.
Connect the tables with foreign keys
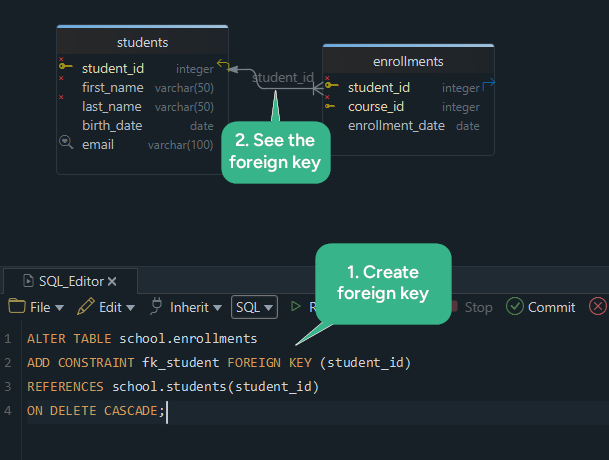
A foreign key requires the values in a column to match a row of another table, which is what keeps an enrollment from pointing at a student who does not exist. In SQL, the key from enrollments to students is one statement:
ALTER TABLE school.enrollments
ADD CONSTRAINT fk_student FOREIGN KEY (student_id)
REFERENCES school.students(student_id)
ON DELETE CASCADE;
Run the statement in the SQL Editor, and DbSchema draws the foreign key as a line between the two tables.
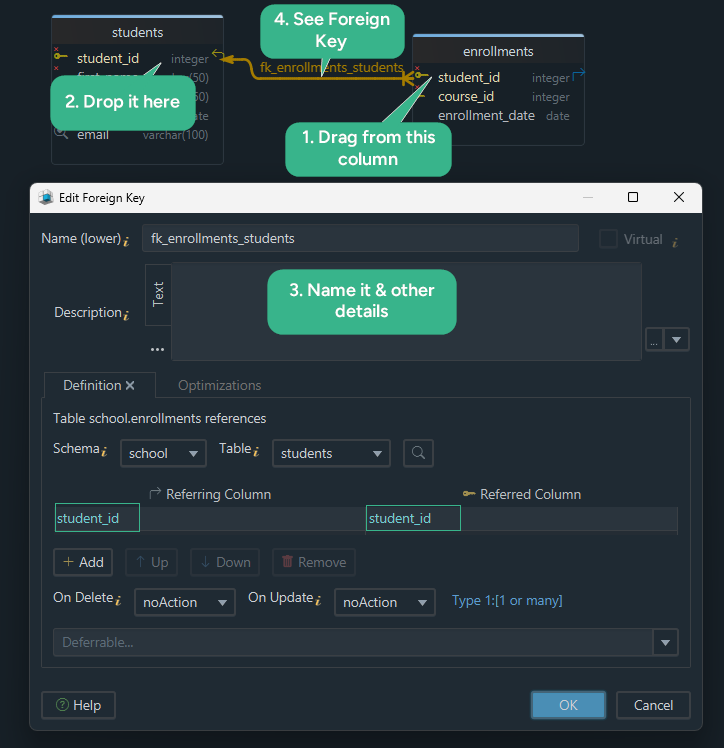
The same key is a drag on the diagram:
- Hover over
student_idinenrollmentsuntil a small connector handle appears on the right edge of the column. - Drag from that handle to
student_idinstudents. DbSchema creates the foreign key and draws the line. - Double-click the line to open the Foreign Key Editor.
- Check which column points at which, rename the key if you like, and set On Delete to
CASCADE, so the key matches the statement above.
ON DELETE CASCADE in the statement is one of five actions that PostgreSQL knows for the enrollments of a deleted student, and in DbSchema the On Delete field of the Foreign Key Editor sets it:
| action | the enrollments of a deleted student |
|---|---|
NO ACTION (the default) | stay, and the delete fails |
RESTRICT | stay, and the delete fails, with no option to defer the check |
CASCADE | are deleted with the student |
SET NULL | get a NULL student_id, which NOT NULL refuses here |
SET DEFAULT | get the column's default, which student_id lacks, so it fails too |
course_id needs the same kind of key to courses. Draw it the same way, or run the statement below. With no ON DELETE clause it takes the default, NO ACTION:
ALTER TABLE school.enrollments
  ADD CONSTRAINT fk_course FOREIGN KEY (course_id)
  REFERENCES school.courses (course_id);

CREATE INDEX ON school.enrollments (course_id);
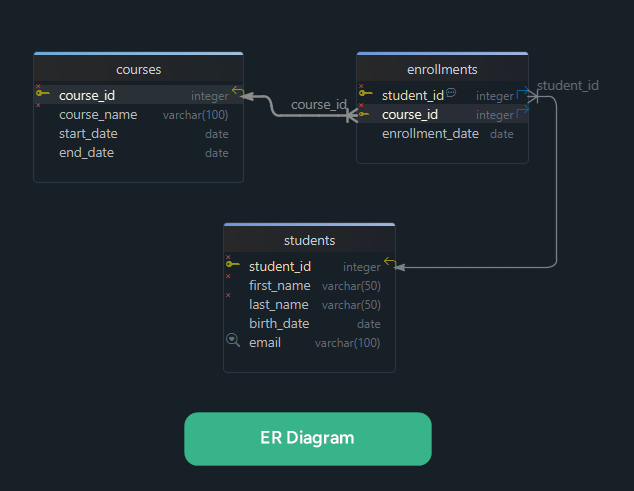
The index is there because PostgreSQL creates none for a foreign key, and deleting a course makes it search enrollments for rows with that course_id. The primary key already serves a search by student_id, its first column. With both keys in place, the diagram shows how the three tables connect. The foreign keys article goes further into keys and their actions.
What the keys do when rows change
One student, one course and one enrollment are enough to see every key at work:
INSERT INTO school.students (first_name, last_name) VALUES ('Ada', 'Byron');
INSERT INTO school.courses (course_id, course_name) VALUES (1, 'Databases');
INSERT INTO school.enrollments (student_id, course_id) VALUES (1, 1);
SERIAL gave Ada the student_id 1. Enrolling her in the same course a second time breaks the two-column primary key:
INSERT INTO school.enrollments (student_id, course_id) VALUES (1, 1);
ERROR:  duplicate key value violates unique constraint "enrollments_pkey"
DETAIL:  Key (student_id, course_id)=(1, 1) already exists.
Deleting the course fails, because the key on course_id has the default action:
DELETE FROM school.courses WHERE course_id = 1;
ERROR:  update or delete on table "courses" violates foreign key constraint "fk_course" on table "enrollments"
DETAIL:  Key (course_id)=(1) is still referenced from table "enrollments".
Deleting the student succeeds, and the cascading key on student_id takes the enrollment with it:
DELETE FROM school.students WHERE student_id = 1;
SELECT count(*) FROM school.enrollments;
| count |
|---|
| 0 |
Give the application access to the schema
A schema is also where access starts. A role that does not own the schema can use nothing in it until the owner grants USAGE on the schema, and the tables and sequences need privileges of their own. With all three tables in place, give an application role what it needs:
CREATE ROLE school_app LOGIN;
GRANT USAGE ON SCHEMA school TO school_app;
GRANT SELECT, INSERT, UPDATE, DELETE ON ALL TABLES IN SCHEMA school TO school_app;
GRANT USAGE ON ALL SEQUENCES IN SCHEMA school TO school_app;
ALL TABLES covers the tables that exist when the grant runs, so a table added later needs a grant of its own. The sequence grant lets school_app draw new student_id values. As a superuser, SET ROLE switches your session to the new role, which reads the course that the earlier delete left in place:
SET ROLE school_app;
SELECT course_id, course_name FROM school.courses;
RESET ROLE;
| course_id | course_name |
|---|---|
| 1 | Databases |
Take USAGE on the schema away, and the same query stops at the schema even though the table grants are still there:
REVOKE USAGE ON SCHEMA school FROM school_app;
SET ROLE school_app;
SELECT course_id, course_name FROM school.courses;
ERROR:  permission denied for schema school
LINE 1: SELECT course_id, course_name FROM school.courses;
RESET ROLE switches the session back to your own role.
Add descriptions and comment tags to the tables
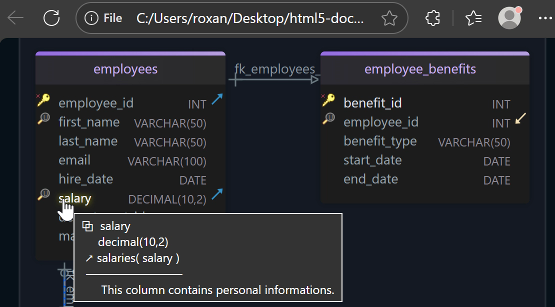
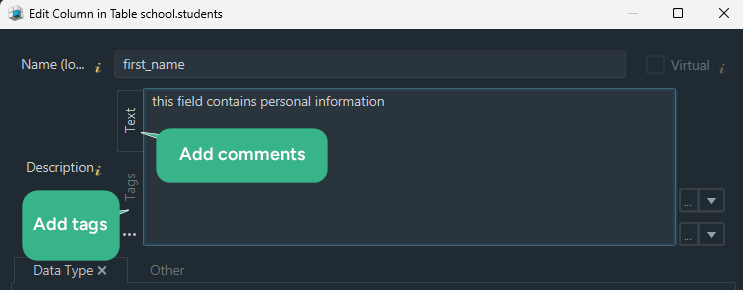
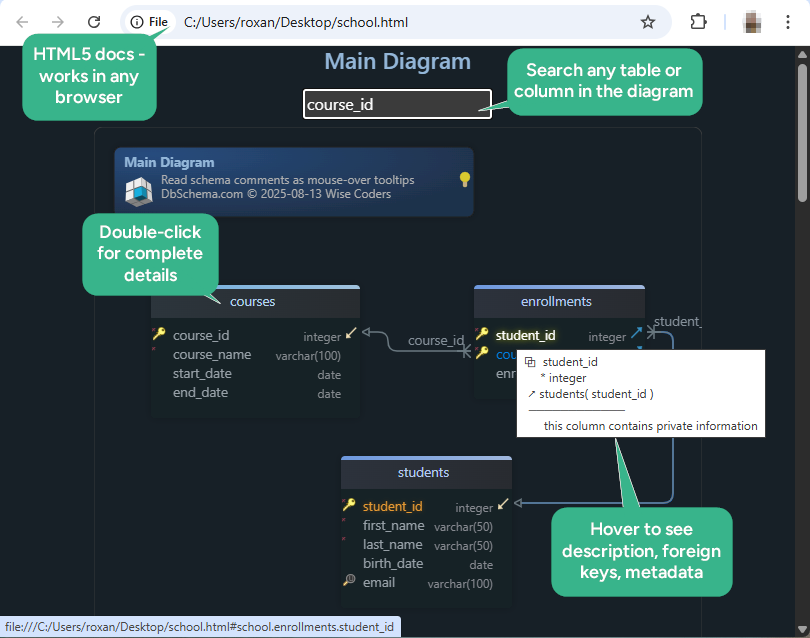
Whether first_name counts as personal data is a fact nobody can read from the column. DbSchema keeps a Description field on every table and every column, and what you type there becomes content in all three documentation formats, HTML5, PDF and Markdown. In the HTML5 output it also appears as a mouse-over tooltip on the table or column name. Beside the free text, comment tags attach key-value pairs to a table or a column, such as an owner, a sensitivity level or a deprecation status, and they come out in the generated documentation as well. Descriptions and tags are stored in the model file, so they survive a database you rebuild from scratch.
PostgreSQL keeps comments of its own, stored in the database rather than in the model. Each object holds one comment, and a new COMMENT replaces the old one:
COMMENT ON TABLE school.enrollments IS 'One row per student per course';
COMMENT ON COLUMN school.students.first_name IS 'This field contains personal information';
The psql \d commands show them, and so do two built-in functions, where the 2 is the position of first_name in students:
SELECT obj_description('school.enrollments'::regclass) AS table_comment,
       col_description('school.students'::regclass, 2) AS column_comment;
| table_comment | column_comment |
|---|---|
| One row per student per course | This field contains personal information |
Synchronize the model with the PostgreSQL database
DbSchema works in one of two modes, and the mode decides where an edit lands. Connected, every schema change runs in PostgreSQL at once, as the drawn table did. Disconnected, DbSchema saves the change to the .dbs model file and sends nothing to the database, which is the safer way to try a change you are not sure about. The connection menu in the toolbar switches between the two.
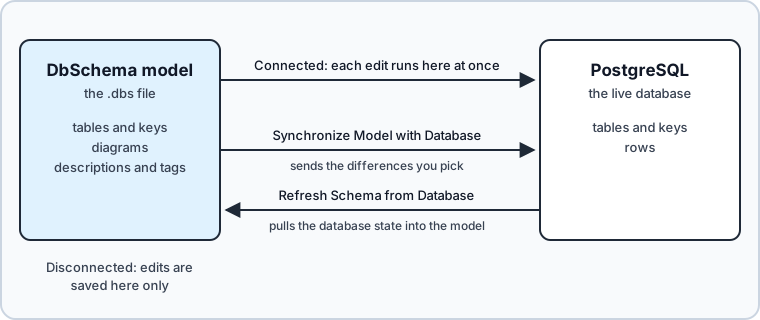

A design made disconnected reaches PostgreSQL through schema synchronization, a Pro feature. Save the model to a file first, so the design exists in one more place than the database, and follow these steps:
- Connect to PostgreSQL.
- Open Schema, then Synchronize Model with Database.
- Read the statements that DbSchema generated, edit them if you need to, and click Execute.
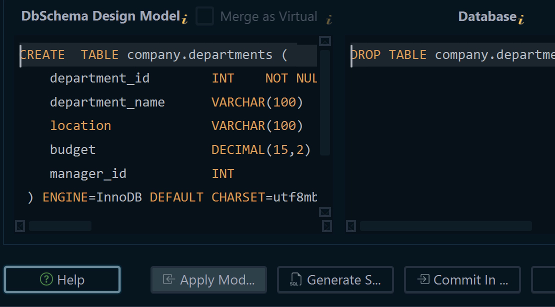
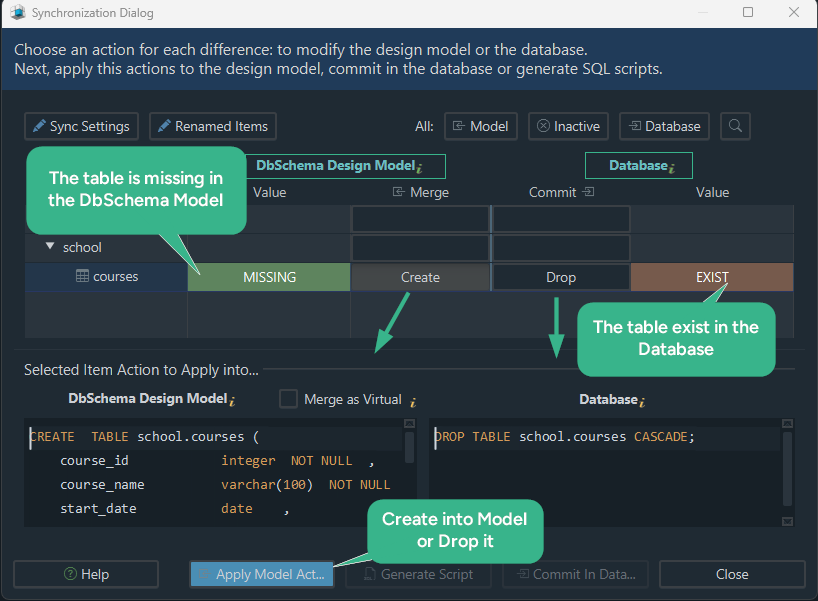
Changes travel the other way just as often, because a colleague deployed a migration while your model sat on your disk. In DbSchema, Schema, then Refresh Schema from Database pulls the current database state into the model. Schema, then Compare Model with Database lists what differs, object by object, with a choice per difference: update the model, push the change to the database, or skip it. For a database that has none of your tables yet, Schema, then Create or Upgrade Schema in Database generates the DDL for the whole model at once.
Save the model and share it with the team
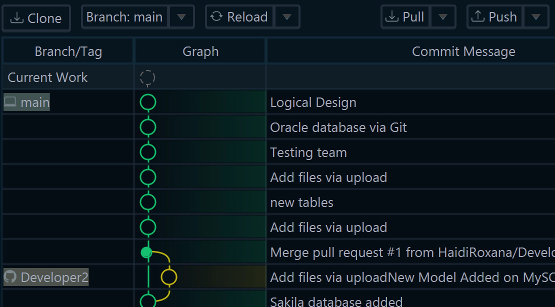
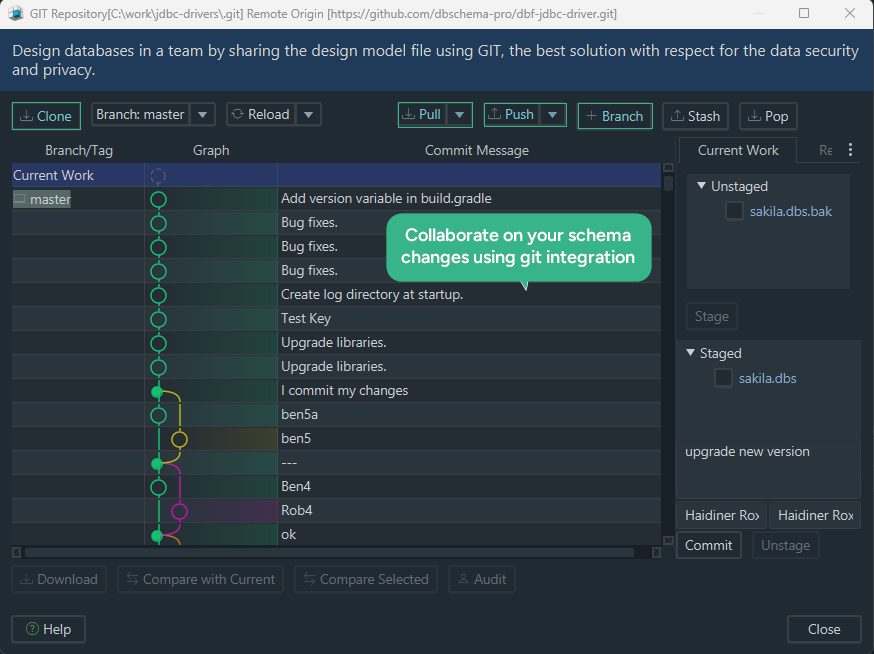
The design is saved as a .dbs file, which is XML and holds the whole project: tables, columns, foreign keys, diagrams, descriptions and tags. Saving the model to a file is a Pro feature. Because the file is plain XML, it belongs in the same repository as the application code, and DbSchema talks to Git itself: open the Model menu and choose Git — Collaborative Design to clone a repository, stage and commit the file, push it, and pull what your colleagues pushed. The Git dialog also creates branches and stashes work in progress.
For everyone who needs to read the schema and never opens DbSchema, export it: Diagram, then Export HTML5 or PDF Documentation, with HTML5, PDF or Markdown as the format. The HTML5 output opens in any browser with no server, carries the diagram as a vector image and a searchable table list, and shows each column description when you hover over the column. Generating documentation is a Pro feature, and generating database documentation walks through the export.
To build the school schema yourself, download DbSchema at https://dbschema.com/download.html and start from the Welcome Screen. Connecting to PostgreSQL, reverse-engineering an existing database, the diagrams and the SQL Editor are in the free Community Edition; designing from scratch, saving the model to a file, synchronizing it with the database and exporting the documentation are in Pro.