How to Run MySQL in Docker Step by Step
For a developer who wants a MySQL server on their own machine without installing MySQL; each step gives the Docker command and what it prints.
On this page
You need a MySQL server for a project and would rather not install MySQL on your machine. Docker can run it in a container. Two commands do the job: docker run starts MySQL with a database, a user and a volume for the data, and docker exec opens the mysql client inside the container.
docker run --name mysql-dev \
  -e MYSQL_ROOT_PASSWORD=change-me \
  -e MYSQL_DATABASE=appdb \
  -e MYSQL_USER=app \
  -e MYSQL_PASSWORD=also-change-me \
  -p 3306:3306 \
  -v mysql-data:/var/lib/mysql \
  -d mysql:lts

docker exec -it mysql-dev mysql -u root -p
Docker Engine or Docker Desktop has to be installed and running. The first docker run also downloads the image. The sections below take each step in turn, with what Docker prints.
Pull the MySQL image and choose a tag
The image to use is mysql, the Docker Official Image for MySQL[1]. docker run pulls it when it is missing, and you can also pull it ahead of time:
docker pull mysql:lts
The part after the colon is the tag, and it picks the MySQL version. These are the tags most projects need, as Docker Hub listed them on September 8, 2026[1]:
| tag | MySQL version | release track |
|---|---|---|
lts, 9.7, 9 | 9.7.2 | LTS |
8.4, 8 | 8.4.11 | LTS, previous series |
latest, innovation, 26 | 26.7.0 | Innovation |
Choose lts for a server you want to keep. An LTS series gets only necessary fixes, while an Innovation release adds features, can change behavior, and is supported only until the next Innovation release[2]. So latest is not the conservative choice its name suggests. After 9.7, MySQL numbers its versions by year and month, which makes 26.7 the July 2026 release[2]. Pin a version tag such as 8.4 when your project has to match a server that runs that version.
Older tutorials pull mysql/mysql-server. That is a separate image, and Docker Hub shows its last update in January 2023[3]. Use mysql instead.
Start the MySQL container
The docker run command at the top of this page starts the container. Each option does one job:
| option | what it does |
|---|---|
--name mysql-dev | names the container, so later commands can use mysql-dev |
-e MYSQL_ROOT_PASSWORD | sets the password of the MySQL root account, and is required |
-e MYSQL_DATABASE | creates the database appdb on the first start |
-e MYSQL_USER, -e MYSQL_PASSWORD | create the account app, with all rights on appdb |
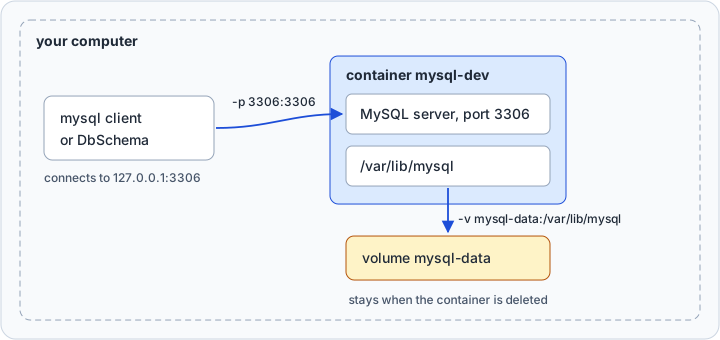
-p 3306:3306 | publishes MySQL's port 3306 on port 3306 of your computer |
-v mysql-data:/var/lib/mysql | keeps the data files in a volume named mysql-data |
-d | runs the container in the background |
mysql:lts | the image and its tag |
MYSQL_USER and MYSQL_PASSWORD work as a pair: the image creates the account only when both are set[1]. The account gets all privileges on appdb and none elsewhere, which makes it the one to give an application.
The diagram shows what -p and -v connect. A program on your computer reaches MySQL through port 3306, and the data files live in the volume rather than in the container:
Check that the container is running with docker ps. The --format option keeps only the columns you need here:
docker ps --format "table {{.Names}}\t{{.Status}}\t{{.Ports}}"
NAMES       STATUS          PORTS
mysql-dev   Up 21 seconds   0.0.0.0:3306->3306/tcp, [::]:3306->3306/tcp
Up means the container runs, not that MySQL is ready. The official image defines no health check, so its STATUS never shows (healthy), unlike the mysql/mysql-server image that older tutorials show. The server log tells you when MySQL is ready:
docker logs mysql-dev
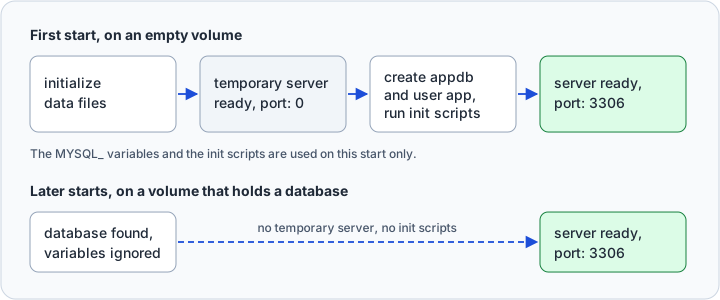
On the first start, the log prints the line mysqld: ready for connections twice. The first one contains port: 0. It comes from a temporary server that the image starts without networking, to create appdb and the app account. The second one contains port: 3306, and from then on MySQL accepts connections. That setup runs only once. A later start on the same volume goes straight to the real server:
If you would rather not pick a root password, set MYSQL_RANDOM_ROOT_PASSWORD=yes instead. The image then generates one and prints it in the log, after GENERATED ROOT PASSWORD:[1]. MYSQL_ALLOW_EMPTY_PASSWORD=yes starts MySQL with no root password at all, which the image documentation says leaves your MySQL instance "completely unprotected"[1]. Use it only on a container that nothing outside your computer can reach.
MYSQL_DATABASE saves you a CREATE DATABASE statement, and the user variables save you a CREATE USER and GRANT. Write those statements yourself when you need a second database, or an account with fewer rights.
Keep the data in a named volume
MySQL writes its data files to /var/lib/mysql inside the container[1], and -v mysql-data:/var/lib/mysql mounts a volume on that folder. Docker keeps a volume apart from the container, so when you delete the container, the volume and every table in it stay[4].
Leaving out -v does not give you a container without a volume. The image declares /var/lib/mysql as a volume, so Docker creates an anonymous one with a random name[4]. The next docker run never finds it again and starts an empty server. A name is what lets a new container reuse the data.
These commands manage volumes:
docker volume lslists the volumes on your computer.docker volume inspect mysql-datashows where Docker stores the files.docker volume rm mysql-datadeletes the volume and the data in it. There is no undo.
The image reads the MYSQL_ variables only on the first start, while the volume is still empty. When the volume already holds a database, the image leaves it untouched[1]. That is what you want on a restart. It is also why a new MYSQL_ROOT_PASSWORD on an existing volume changes nothing: the old password stays.
To start with tables in place, put SQL files in a folder and mount it on /docker-entrypoint-initdb.d. On the first start, the image runs every .sh, .sql, .sql.gz, .sql.bz2, .sql.xz and .sql.zst file in it, in alphabetical order[1]. Save this as init/01-schema.sql:
CREATE TABLE customers (
  id   INT PRIMARY KEY AUTO_INCREMENT,
  name VARCHAR(100) NOT NULL
);

CREATE TABLE orders (
  id          INT PRIMARY KEY AUTO_INCREMENT,
  customer_id INT NOT NULL,
  FOREIGN KEY (customer_id) REFERENCES customers (id)
);
Then start a second container on a new, empty volume, with the folder mounted. It publishes port 3307, because mysql-dev already holds 3306. In bash, $PWD is the folder you are in:
docker run --name mysql-seeded \
  -e MYSQL_ROOT_PASSWORD=change-me \
  -e MYSQL_DATABASE=appdb \
  -p 3307:3306 \
  -v mysql-seeded-data:/var/lib/mysql \
  -v "$PWD/init":/docker-entrypoint-initdb.d \
  -d mysql:lts
The log names each script as it runs it, and customers and orders are in appdb once the server is ready:
2026-09-10 20:28:04+00:00 [Note] [Entrypoint]: /usr/local/bin/docker-entrypoint.sh: running /docker-entrypoint-initdb.d/01-schema.sql
Connect to MySQL from inside the container

The container ships with the mysql client, so your computer needs none. docker exec runs it inside the container[5]:
docker exec -it mysql-dev mysql -u root -p
-it attaches your terminal, mysql-dev is the container, and the rest is the command that runs inside it. Type the root password when asked, and you get the mysql> prompt. List the databases to see what the first start created:
SHOW DATABASES;
| Database |
|---|
| appdb |
| information_schema |
| mysql |
| performance_schema |
| sys |
Type exit to leave. Two more commands help when something goes wrong. The first opens a shell in the container, and the second prints the server log:
docker exec -it mysql-dev bash
docker logs mysql-dev
The accounts in the container are the ones you passed to docker run, so the MySQL default username and password of a package install don't apply here.
Connect from your computer
A program on your computer reaches the container through the published port, as if MySQL were installed locally:
mysql -h 127.0.0.1 -P 3306 -u app -p appdb
Write 127.0.0.1, not localhost. On Unix, MySQL programs treat localhost specially and connect through a Unix socket file[6]. Your computer has no socket file for the container, only the TCP port, and -h 127.0.0.1 makes mysql use TCP.
If port 3306 is taken on your computer, by a MySQL installed outside Docker or by another container, publish another host port with -p 3307:3306. MySQL still listens on 3306 inside the container, and only the mysql command changes, to -P 3307.
To install no MySQL client at all, run one in a second container. Put both containers on the same Docker network, and the second one reaches MySQL by the container's name:
docker network create mysqlnet
docker network connect mysqlnet mysql-dev
docker run -it --rm --network mysqlnet mysql:lts mysql -h mysql-dev -u root -p
--rm deletes the second container when you exit mysql.
Connect DbSchema and see the schema as a diagram
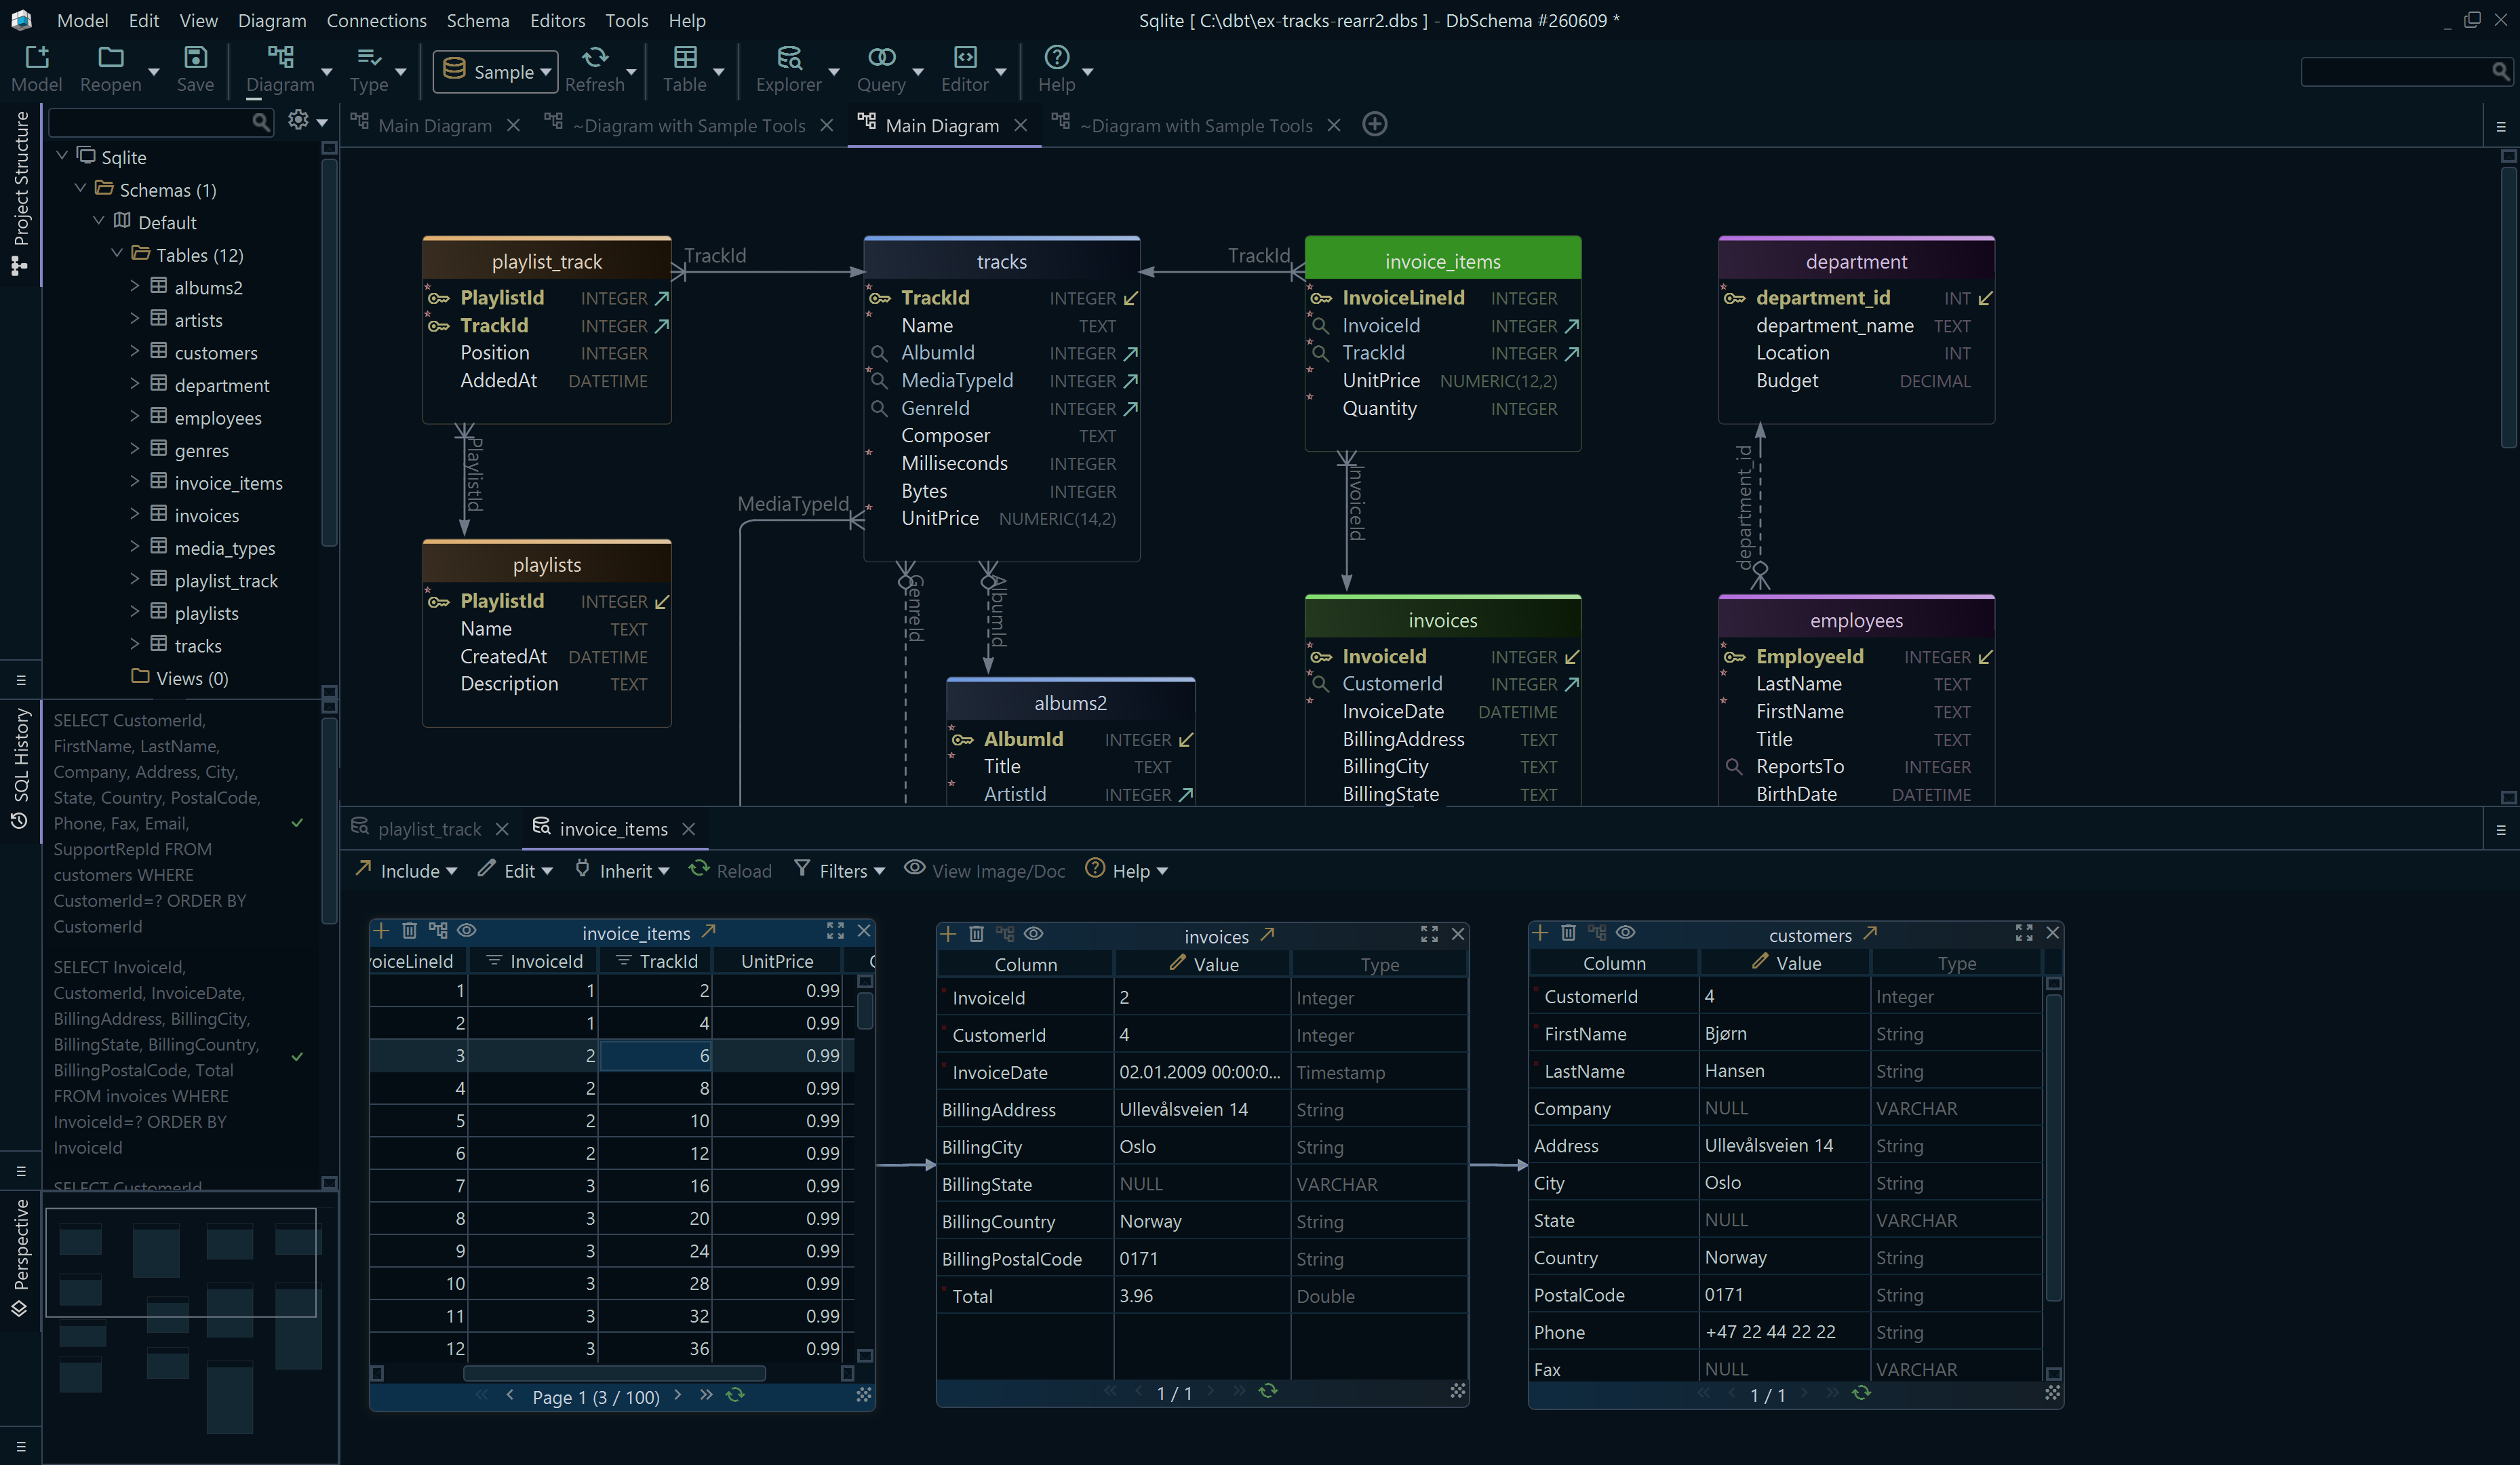
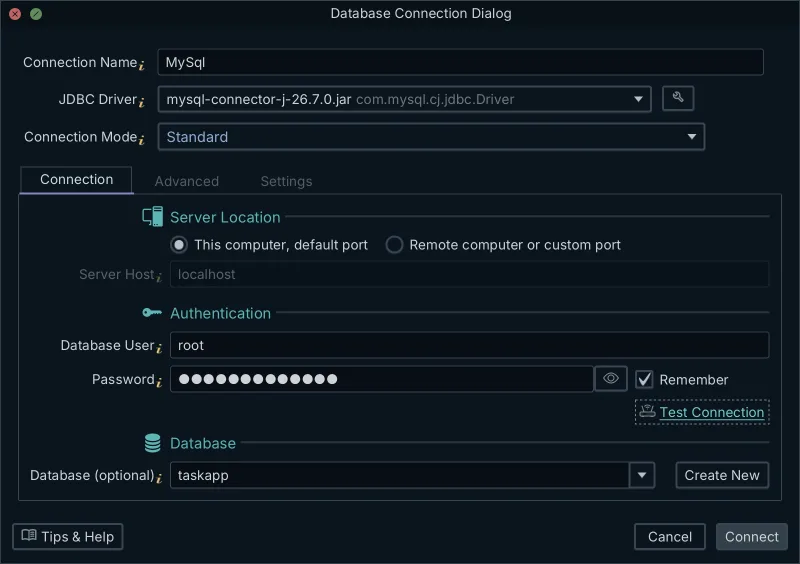
DbSchema connects to the container through the same published port and draws its tables as a diagram. Click Connect to Database and choose MySQL in the list. DbSchema downloads the MySQL JDBC driver and opens the Connection Dialog set up for MySQL. Keep the Method on Standard. For mysql-dev, keep This computer, default port under Where is the database running?, since the container publishes 3306 on your computer. For mysql-seeded, choose Remote computer or custom port, with Server Host 127.0.0.1 and Port 3307. Enter the Database User and Password you passed to docker run, pick appdb as the Database, and click Test Connection to check that the server answers.
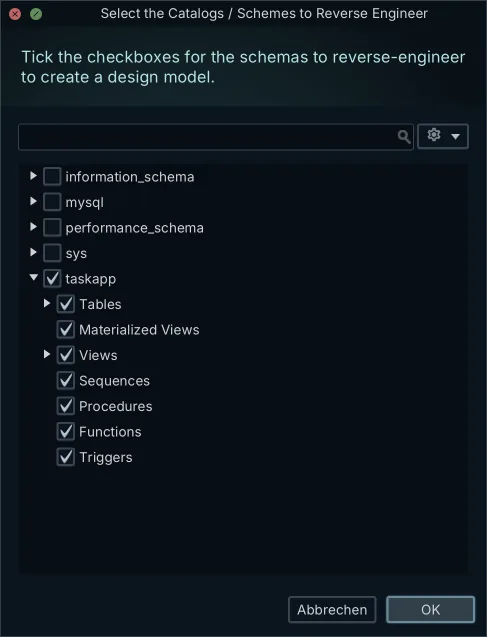
DbSchema then asks which schemas to reverse-engineer. The list shows the system schemas information_schema, mysql, performance_schema and sys beside your own. Tick only your database, and the model holds only your tables.
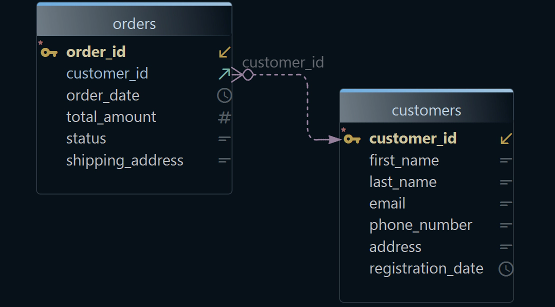
DbSchema reads the tables and draws the diagram with a line for each foreign key. The line is solid when the foreign key column is NOT NULL and dashed when it accepts NULL, as the foreign keys page shows. In the appdb of mysql-seeded, which the init script filled, orders.customer_id is NOT NULL, so its line to customers is solid. The appdb of mysql-dev stays empty until you create tables in it.
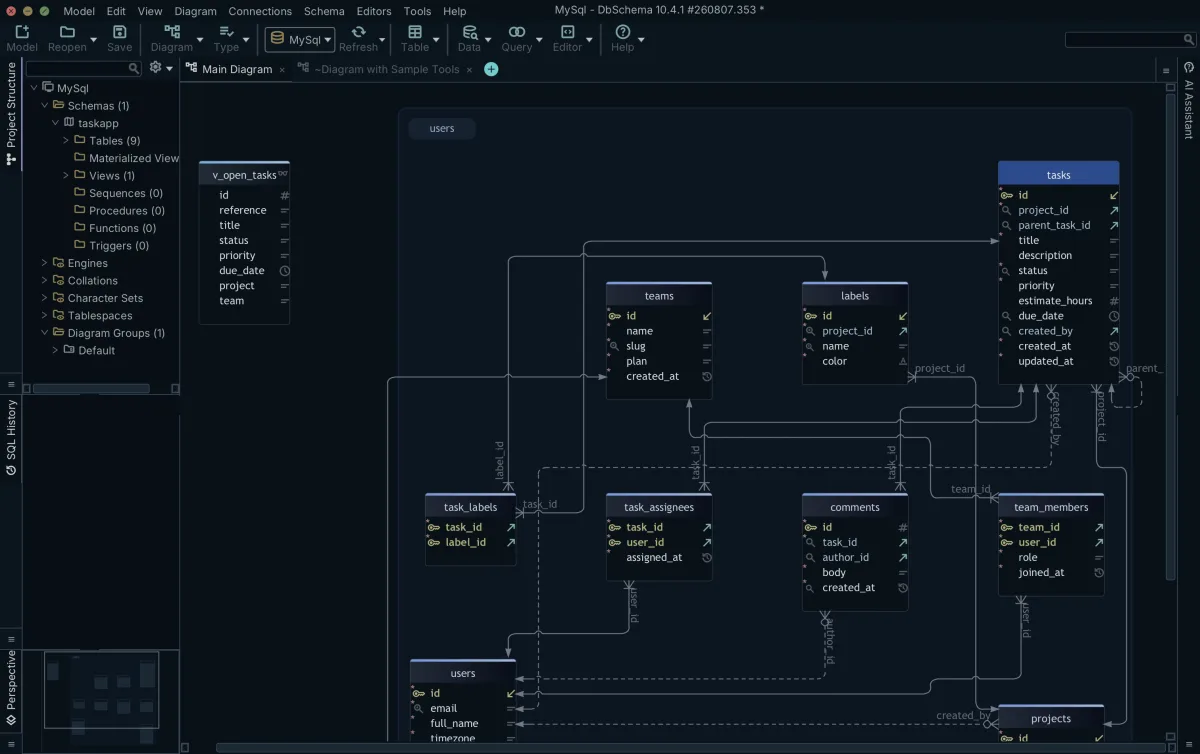
The steps are the same MySQL ER diagram workflow as for a MySQL server outside Docker; the container only sets the host and the port. The MySQL design walkthrough continues from here with editing the schema.
Run the same container with Docker Compose
A Compose file[7] keeps the same settings in a file you can commit with your project. Save this as compose.yaml:
services:
  db:
    image: mysql:lts
    restart: unless-stopped
    environment:
      MYSQL_ROOT_PASSWORD: change-me
      MYSQL_DATABASE: appdb
      MYSQL_USER: app
      MYSQL_PASSWORD: also-change-me
    ports:
      - "3306:3306"
    volumes:
      - mysql-data:/var/lib/mysql
    healthcheck:
      test: ["CMD", "mysqladmin", "ping", "-h", "127.0.0.1", "--silent"]
      interval: 5s
      retries: 20

volumes:
  mysql-data:
docker compose up -d starts it. docker compose down stops and removes the container but keeps the volume; add -v to delete the volume too[8]. Compose puts the project name in front of the volume's name, and the project name is by default the name of the folder that holds compose.yaml[9]. In a folder named shop, docker volume ls lists shop_mysql-data.
The healthcheck block gives the container a health status, and docker compose ps shows Up 21 seconds (healthy) once MySQL answers. The check pings 127.0.0.1 rather than localhost on purpose. During the first start, the temporary server answers on the socket but not on TCP, so a ping through the socket reports the server ready too early.
Compose waits only until a container is running, not until it is ready[10], and MySQL accepts no connections until its first start completes[1]. So an application service in the same file should wait for the health check. Add this to it:
    depends_on:
      db:
        condition: service_healthy
The application reaches MySQL at host db, the service's name, on port 3306, because Compose puts both services on one network.
Stop, restart and delete the container
Stopping a container does not delete it, and deleting the container does not delete the data:
| command | the container | the data in mysql-data |
|---|---|---|
docker stop mysql-dev | stopped, kept | kept |
docker start mysql-dev | running again | kept |
docker rm mysql-dev | deleted | kept |
docker volume rm mysql-data | has to be deleted first | deleted |
docker stop shuts MySQL down cleanly, and docker ps -a then lists the container as Exited (0). docker rm refuses a container that is still running:
Error response from daemon: cannot remove container "mysql-dev": container is running: stop the container before removing or force remove
Stop it first. docker rm -f removes it anyway, but it kills MySQL with SIGKILL instead of shutting it down[11]. docker rm -v removes only anonymous volumes, so mysql-data survives even that[11]. docker volume rm refuses a volume that any container still uses, stopped or running, with the error volume is in use. Start a new container with -v mysql-data:/var/lib/mysql and it finds every table where you left it.
Common startup and connection errors
Read docker logs mysql-dev first. When MySQL stops, the log says why.
Database is uninitialized and password option is not specified
The container exits right after it starts, with this in its log:
2026-09-10 20:27:00+00:00 [ERROR] [Entrypoint]: Database is uninitialized and password option is not specified
    You need to specify one of the following as an environment variable:
    - MYSQL_ROOT_PASSWORD
    - MYSQL_ALLOW_EMPTY_PASSWORD
    - MYSQL_RANDOM_ROOT_PASSWORD
The volume is empty and no root password was given. Add -e MYSQL_ROOT_PASSWORD=..., or one of the other two variables, and run the container again.
Access denied for user 'root'
ERROR 1045 (28000): Access denied for user 'root'@'localhost' (using password: YES)
If you started the container on an existing volume with a new MYSQL_ROOT_PASSWORD, the image ignored the new password, and the volume keeps the one it was first set up with. Log in with that one, or delete the volume and start again.
Bind for 0.0.0.0:3306 failed: port is already allocated
Another container already publishes port 3306, and docker ps shows which one. Publish another port with -p 3307:3306, or stop the other container. Docker creates the new container before the error, so run docker rm mysql-dev before you run docker run again.
Lost connection to MySQL server at 'reading initial communication packet'
ERROR 2013 (HY000): Lost connection to MySQL server at 'reading initial communication packet', system error: 101
On Docker Desktop, a client that connects while the first start is still setting up gets this error: the published port is open, but MySQL is not listening yet. Wait for the port: 3306 line in docker logs, then connect again.
Can't connect to MySQL server on '127.0.0.1'
Nothing answers on the port: the container is stopped, or it was started without -p. docker ps shows the published ports in its PORTS column. If 3306 is missing there, remove the container and run it again with -p 3306:3306.
Can't connect to local MySQL server through socket
The mysql command used localhost and looked for a Unix socket file on your computer. Connect over TCP with -h 127.0.0.1, or add --protocol=TCP[6].
Authentication plugin 'caching_sha2_password' cannot be loaded
A program or driver too old for MySQL's current authentication is connecting. In MySQL 9.7, caching_sha2_password is the default authentication plugin and mysql_native_password is no longer available[12], so every account in the container uses caching_sha2_password. Update the program, or its JDBC, Python or Node driver, rather than looking for a server setting.
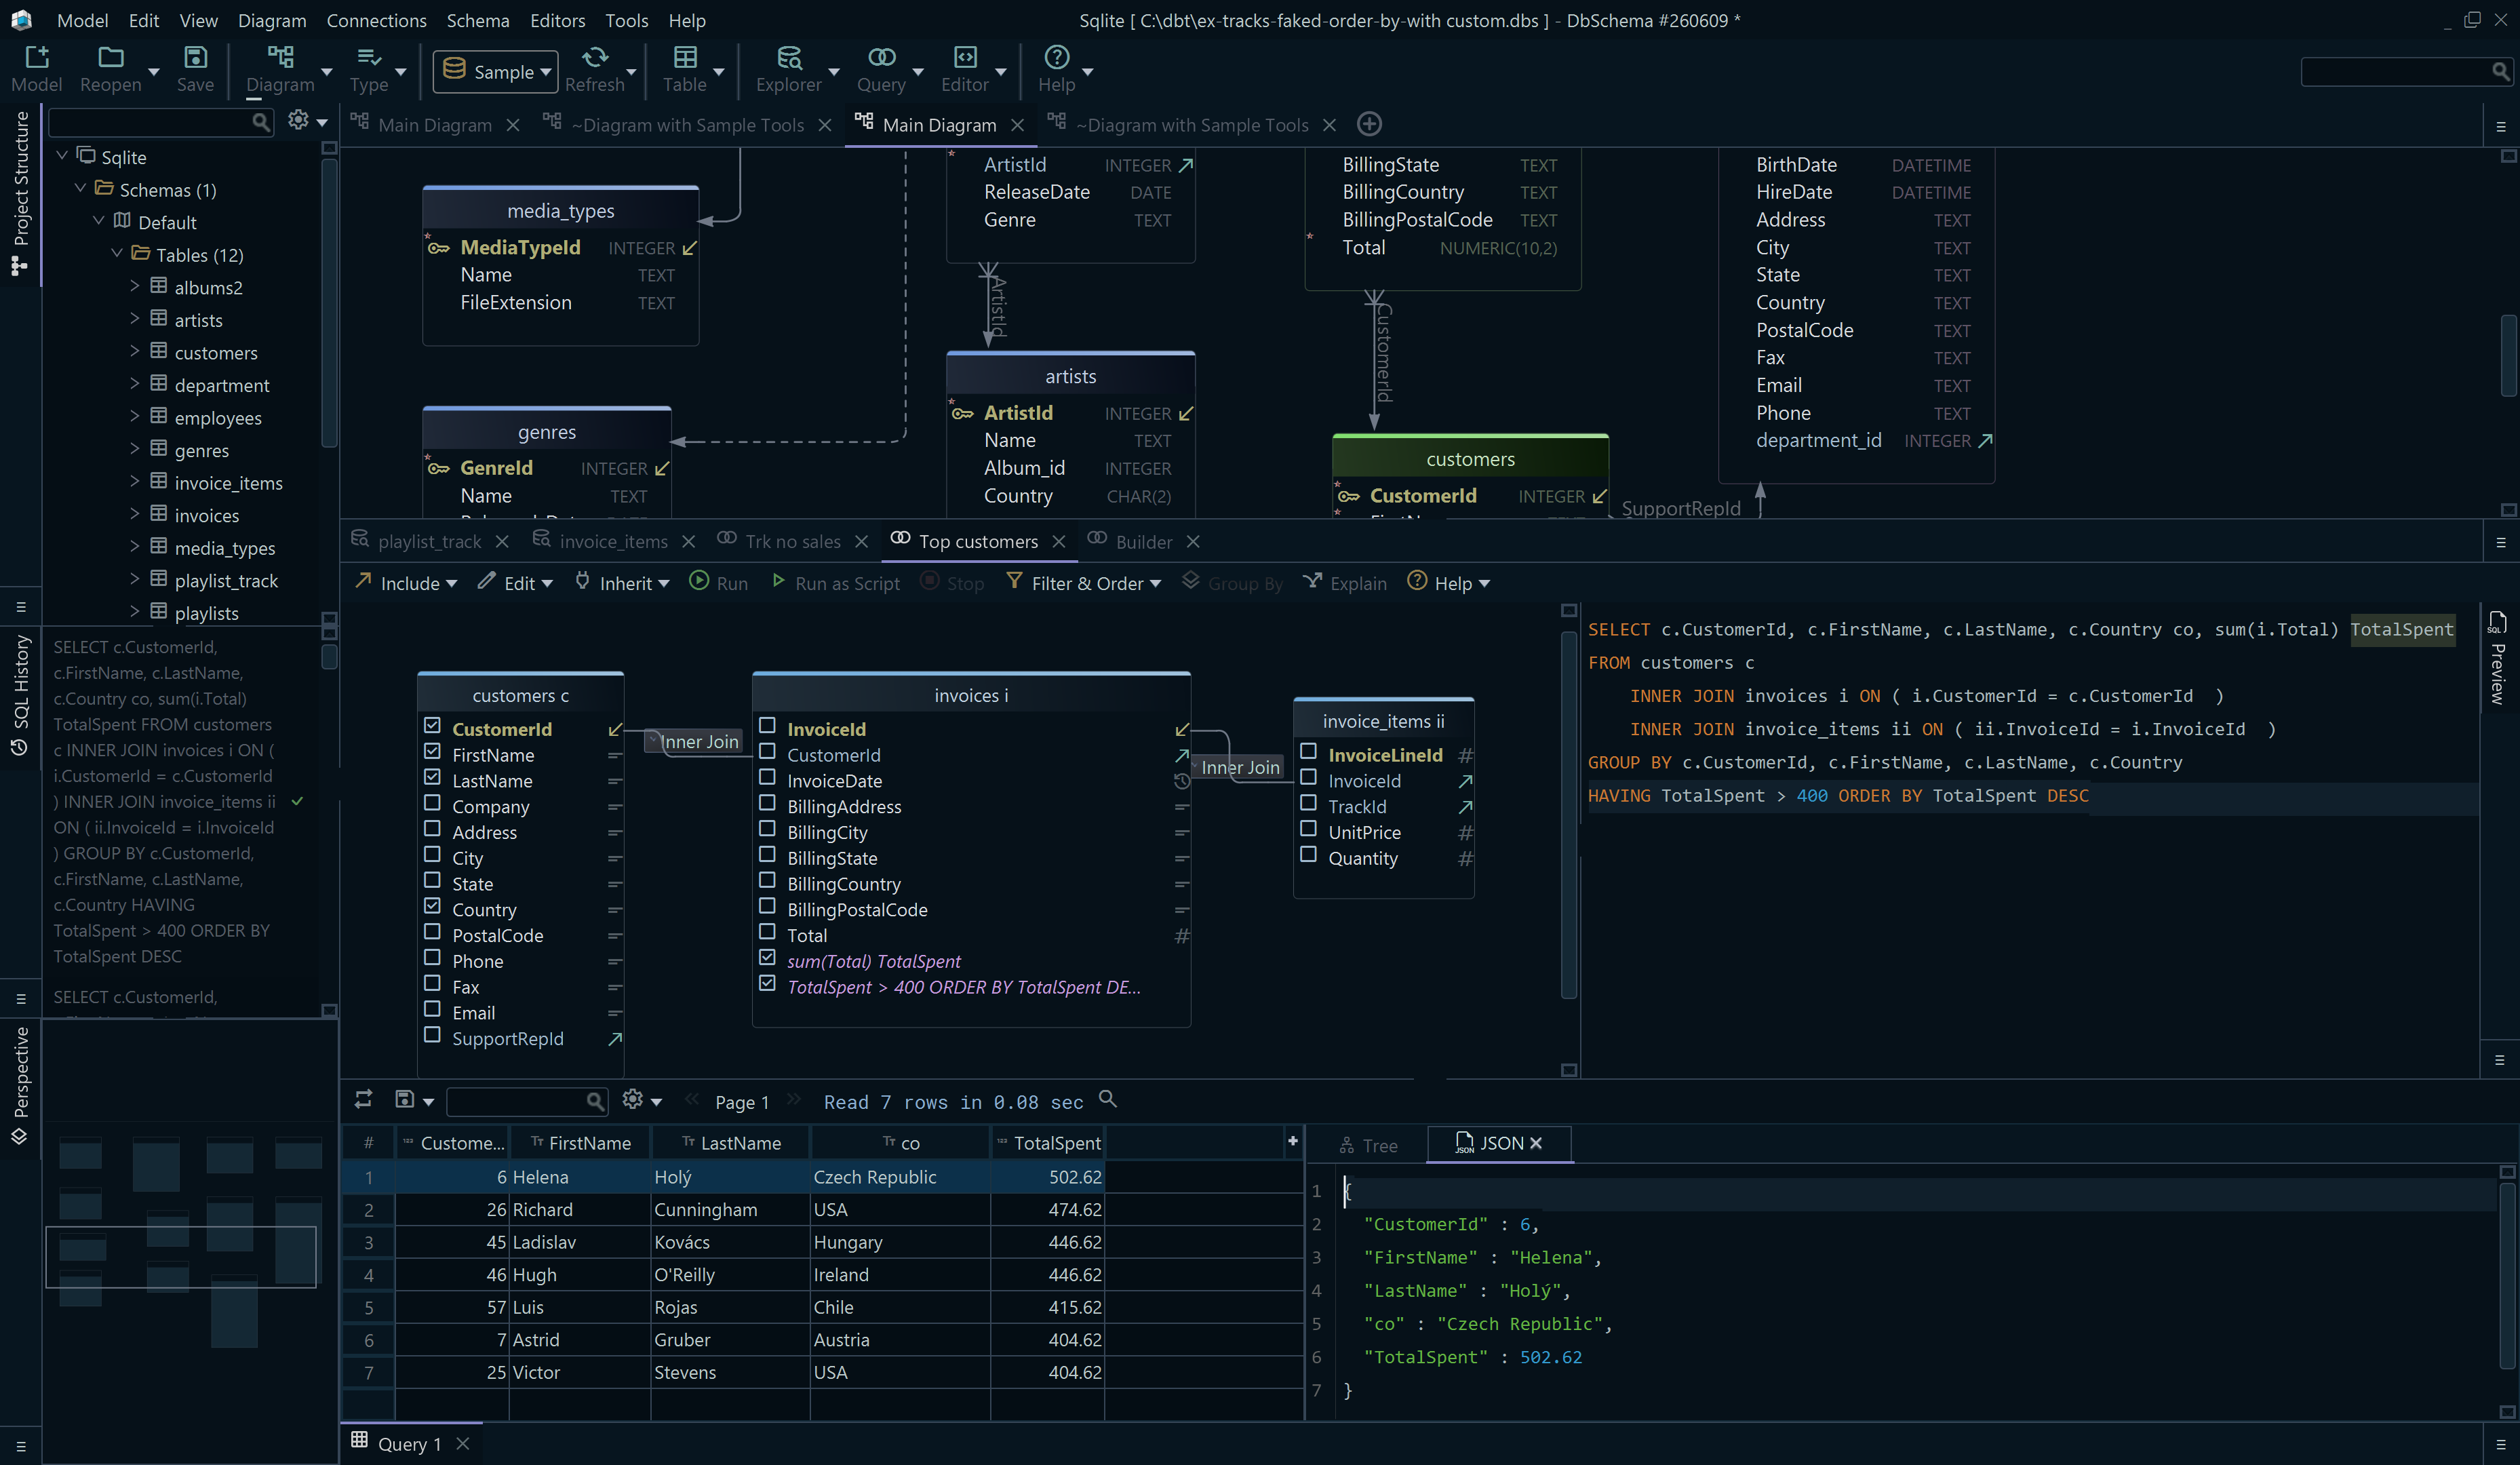
Your MySQL server now runs in a container, keeps its data in a volume and answers on port 3306. Download DbSchema from https://dbschema.com/download.html, connect it to the container, and read the schema back as a diagram or run SQL against it in the SQL editor. Connecting, reverse-engineering, the interactive diagrams and the SQL editor are all in the free Community Edition.
Sources
- mysql, Docker Official Image
- MySQL Releases: Innovation and LTS
- mysql/mysql-server on Docker Hub
- Volumes, Docker Docs
- Basic Steps for MySQL Server Deployment with Docker
- Connecting to the MySQL Server Using Command Options
- Docker Compose, Docker Docs
- docker compose down, Docker Docs
- Specify a project name, Docker Docs
- Control startup and shutdown order in Compose, Docker Docs
- docker container rm, Docker Docs
- Caching SHA-2 Pluggable Authentication
See the container's schema as a diagram
Point DbSchema at 127.0.0.1:3306, reverse-engineer the database your container created, and read the schema as an ER diagram with every foreign key drawn. Connecting, reverse-engineering, interactive diagrams and the SQL editor are in the free Community Edition.