How to Design a Relational Database Schema in 2025
Designing a good relational database schema is one of the most important steps when building any application that stores and manages structured data. It helps avoid messy changes later and makes your app more efficient, secure, and maintainable.
In this article, we’ll walk through the essential steps to design a relational database schema from scratch, using a real-world scenario.
What You'll Learn in This Guide
- Step 1: What Is a Relational Database
- Step 2: Analyze Requirements
- Step 3: Define Entities
- Step 4: Normalize Data
- Step 5: Add Relationships
- Logical vs Physical Design
- Step 7: Insert Data
- Use the Data Editor
- Final Thoughts
To explain how to design a relational database schema step by step,
I’ll use a visual design tool that makes the process easier to understand - and you can download it for free.
DbSchema offers a 15-day PRO Trial, perfect for learning and testing what you’ll see in this guide.
Step 1: Understand What a Relational Database Is
A relational database organizes data into tables made up of rows and columns. Each column has a data type depending on the kind of data it stores - such as text, numbers, or dates.
These tables are connected through relationships, which allow complex data to be stored efficiently and queried easily.
Common relational databases include MySQL, PostgreSQL, Oracle, and SQL Server.
Step 2: Analyze Your Purpose and Business Requirements
Before designing any tables, start by asking: “What kind of data do I need to store, and how will it be used?”
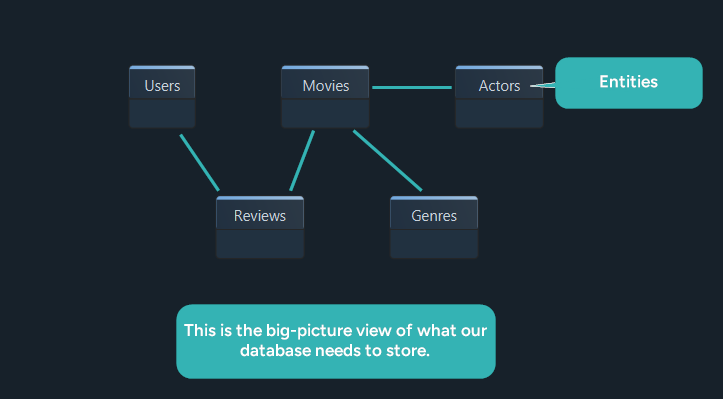
For our example project, StreamFlix, the goal is to build a basic movie streaming platform. We’ll need to store:
- Users → and their profiles
- Movies → with details like title and duration
- Reviews → users leave on movies
- Actors → who appear in movies
- Genres → for categorizing movies
Now think about how these things connect:
- A user → can leave many reviews
- A movie → can have many genres
- An actor → can be in many movies
Understanding the business needs helps you identify the building blocks (called entities) and how they relate -> this is the foundation of your schema.
Step 3: Define the Entities and Attributes (Initial Draft)
Now that you know what your application needs to store, the next step is to list the main entities (which will become tables) and their attributes (which will become columns).
Here’s the initial set of entities for StreamFlix:
| Entity | Attributes |
|---|---|
| Users | user_id, username, email, created_at |
| Movies | movie_id, title, release_year, duration_minutes |
| Reviews | review_id, user_id, movie_id, rating, comment |
| Genres | genre_id, name |
| Actors | actor_id, name, birth_year, country |
| MovieGenres | movie_id, genre_id (composite PK) |
| MovieActors | movie_id, actor_id (composite PK) |
At this stage, the structure looks clean, but looks can be deceiving. What seems simple now can easily turn into a mess if we’re not careful with how we store related values. That’s why the next step, normalization, is critical.
We’ll use real examples to show you how to avoid common issues and design a solid schema from the beginning.
Step 4: Normalize the Data (Refine the Model)
Now that we’ve drafted the main entities and their attributes, it’s time to refine the structure using a process called normalization.
Normalization helps:
- Avoid repeating the same data across multiple rows or tables
- Keep your information consistent and easier to update
- Make your database more efficient to query and maintain
We’ll go through the first three normal forms (1NF, 2NF, and 3NF), which are the most commonly used in relational database design.
First Normal Form (1NF): Keep Values Atomic
In First Normal Form, each column should store only one value - not lists, grouped items, or comma-separated values.
✖️ Not in 1NF:
| 🗝️ movie_id | title | genres | actors |
|---|---|---|---|
| 1 | The Matrix | Action, Sci-Fi | Keanu Reeves, Carrie-Anne Moss |
In this version, both the genres and actors columns contain multiple values. This makes it difficult to search, filter, or update data.
✔ In 1NF (Split into separate tables):
Movies
| 🗝️ movie_id | title |
|---|---|
| 1 | The Matrix |
MovieGenres
| 🗝️ movie_id | genre |
|---|---|
| 1 | Action |
| 1 | Sci-Fi |
MovieActors
| 🗝️ movie_id | actor |
|---|---|
| 1 | Keanu Reeves |
| 1 | Carrie-Anne Moss |
Now, each piece of information has its own row and place.
Second Normal Form (2NF): Remove Partial Dependencies
If a table has a composite primary key (two or more columns), then every non-key column should depend on all parts of that key, not just one.
✖️ Not in 2NF:
| 🗝️ movie_id | 🗝️ genre_id | genre_name |
|---|---|---|
| 1 | 2 | Sci-Fi |
| 1 | 3 | Action |
In this case, genre_name depends only on genre_id, not on the full primary key (movie_id, genre_id). That’s a partial dependency.
✔ Normalized Solution:
Split the data into two tables:
MovieGenres (Join table)
| 🗝️ movie_id | 🗝️ genre_id |
|---|---|
| 1 | 2 |
| 1 | 3 |
| 2 | 2 |
Genres
| 🗝️ genre_id | genre_name |
|---|---|
| 2 | Sci-Fi |
| 3 | Action |
Now, genre_name is stored only once in the Genres table and referenced by ID.
Third Normal Form (3NF): Remove Transitive Dependencies
Goal: Eliminate transitive dependencies - non-key columns should depend directly on the primary key, not on other non-key columns.
The problem:
In the table below, review_id is the primary key, but user_name and phone_number depend on user_id, which is not the primary key.
This creates a transitive dependency - and it breaks 3NF.
✖️ Not in 3NF:
| 🗝️ review_id | user_id | user_name | phone_number | movie_id | rating | comment |
|---|---|---|---|---|---|---|
| 501 | U001 | Alice Martin | 555-342-9752 | 101 | 5 | Loved it! |
| 502 | U002 | Ben Carter | 222-865-9876 | 102 | 4 | Well written. |
Changing a user's name or phone_number would require updating every review they’ve written.
✔️ 3NF (After normalization):
Solution: Move the user’s name and phone_number into a separate Users table and reference them in Reviews using user_id.
Reviews Table
| 🗝️ review_id | 🗝️ user_id | movie_id | rating | comment |
|---|---|---|---|---|
| 501 | U001 | 101 | 5 | Loved it! |
| 502 | U002 | 102 | 4 | Well written. |
Users Table
| 🗝️ user_id | user_name | phone_number |
|---|---|---|
| U001 | Alice Martin | 555-342-9752 |
| U002 | Ben Carter | 222-865-9876 |
Now:
- All non-key columns depend only on the primary key of their table
- No transitive dependencies exist
- Updating a user’s info happens in one place (the
Userstable)
3NF keeps your schema clean, avoids duplication, and simplifies maintenance.
Now that your schema follows the three normal forms:
- Each table contains focused, non-redundant data
- Relationships can be handled cleanly
- Your design is easier to scale and maintain

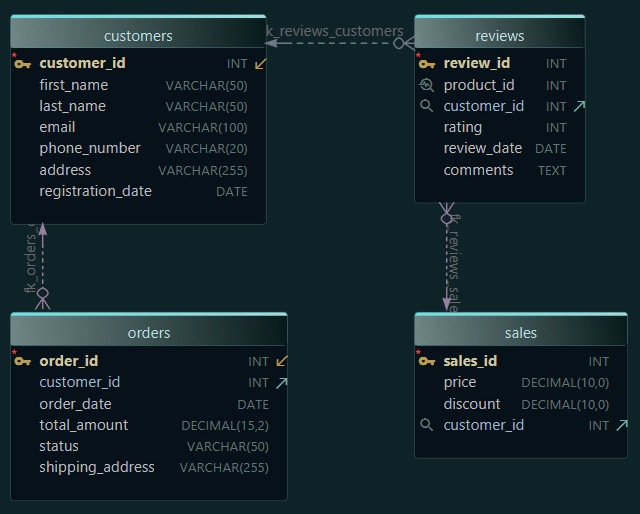
Step 5: Add Primary Keys and Relationships
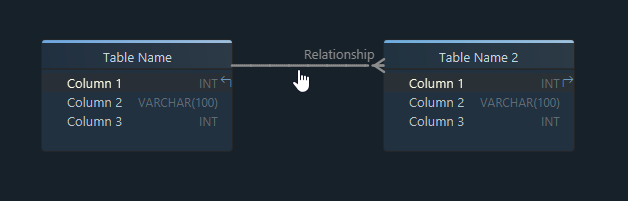
Now that we have clean, normalized tables, it's time to connect them using primary keys and foreign keys. These keys enforce the structure and ensure that data in related tables stays consistent.
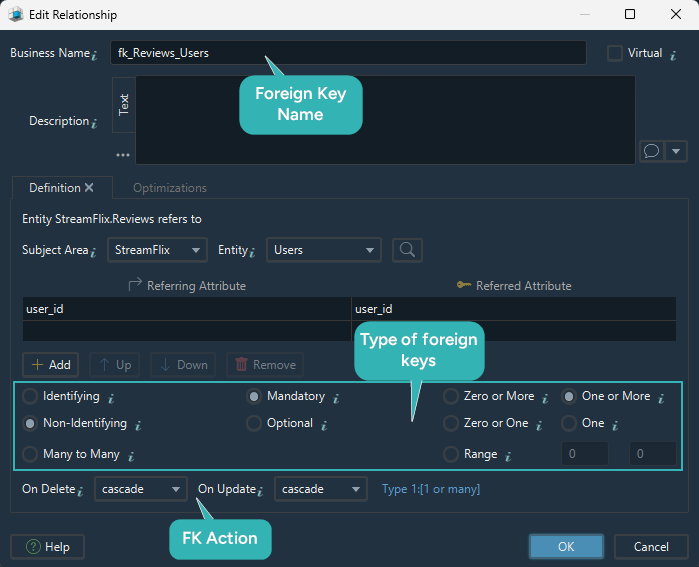
In DbSchema, when you define a relationship between two tables, you’ll also need to configure options like:
- Identifying vs. Non-Identifying
- Mandatory vs. Optional
- Cardinality (One, One or More, Zero or More)
- What happens on Delete or Update (e.g. CASCADE)
Here’s how to configure each relationship in our schema:
1. MovieGenres.movie_id → Movies.movie_id
2. MovieGenres.genre_id → Genres.genre_id
The relationship between Movies and Genres is a typical many-to-many. A movie can have multiple genres, and a genre can belong to many movies.
In relational databases, many-to-many relationships can't be represented directly. Instead, they are implemented using an additional table - in this case, MovieGenres.
- Type: Many-to-Many (via join table)
- Identifying: Identifying
- Mandatory: Yes
- Cardinality: One → Zero or More (on both sides)
- On Delete:
CASCADE
In tools like DbSchema, join tables like this are often created automatically when you define a many-to-many relationship. But here, we created the
MovieGenrestable manually in our logical design to help you better understand how this type of relationship is represented in a real database.
3. MovieActors.movie_id → Movies.movie_id
4. MovieActors.actor_id → Actors.actor_id
Just like with genres, the relationship between Movies and Actors is also many-to-many. One actor can play in multiple movies, and each movie can have many actors.
This is represented using the MovieActors join table.
- Type: Many-to-Many (via join table)
- Identifying: Identifying
- Mandatory: Yes
- Cardinality: One → Zero or More (on both sides)
- On Delete:
CASCADE
We manually created the
MovieActorstable in the logical design to explain how many-to-many relationships are implemented. DbSchema can also generate this kind of table for you automatically during the physical design, but it’s useful to see how it works under the hood.
5. Reviews.user_id → Users.user_id
- Type: One-to-Many
- Identifying: Non-Identifying
- Mandatory: Yes (a review must belong to a user)
- Cardinality: One → One or More
- On Delete:
CASCADEornoAction
6. Reviews.movie_id → Movies.movie_id
- Type: One-to-Many
- Identifying: Non-Identifying
- Mandatory: Yes
- Cardinality: One → One or More
- On Delete:
CASCADEornoAction

Each of these relationships enforces data integrity and connects your tables in a structured way. Once defined, your schema now has clear rules for how data relates and behaves across all entities.
What Comes Next: From Logical to Physical Design
What we’ve created so far is a logical design - a plan of how the data should be organized. It defines the entities, their attributes, and how they relate. But at this stage, it’s just the structure (metadata), not something you can use yet to insert real data.
To work with an actual database, we need to convert the logical design into a physical one.
What does that mean?
- Entities become real tables
- Attributes become columns
- Relationships become foreign keys
- You define data types, constraints, and default values
Once this is done, your database exists in a real system (like MySQL), and you can start inserting data and running queries.
You can do this manually by writing SQL, or automatically using a tool like DbSchema, which can generate the CREATE TABLE scripts for you.

If you want to learn step by step this process, I’ve written a separate guide on that:
Convert Logical Design to Physical Database (MySQL Example)
Inserting Data into Your Tables
Once your physical database is created, the next step is to insert real data into your tables.
Usually, this is done using SQL statements. For example, to insert a movie into the Movies table, you might write something like this:
INSERT INTO Movies (movie_id, title, release_year, duration_minutes)
VALUES (1, 'Inception', 2010, 148);
Usually, writing SQL to insert every row can take time, especially when you're just testing or working with sample data.
An Easier Way: Use DbSchema’s Data Editor
If you're using DbSchema, you can insert data without writing any SQL. The Relational Data Editor lets you:
- Open any table and see it like a spreadsheet
- Add, edit, or delete rows directly
- Use dropdowns for foreign key fields
- Even generate test data automatically
It's a fast and easy way to work with your tables while designing and testing your schema.
To open the Data Editor, just double-click on a table or right-click and select Edit Data.

What You’ve Learned
Designing a relational database schema might seem complex at first, but when you break it down into clear steps, like defining entities, applying normalization, and setting up relationships, it becomes easier to understand.
In this article, you learned how to move from a simple idea to a well-structured logical model, and how that structure is later implemented physically in a real database. Using visual tools like DbSchema makes the process more intuitive, especially when you're just starting or working on your own.
Want to try everything step by step like in this article?
You can download DbSchema for free and use the 15-day PRO Trial to follow along and build your own schema visually.