Sqlite CREATE TABLE Explained with Examples

Table of Contents
- Introduction
- Prerequisites
- What is a Data Type?
- SQLite Data Types
- Creating a Table in SQLite3
- Creating a Table in DbSchema
- Conclusion
- References
1. Introduction
SQLite is a self-contained, serverless, zero-configuration, and transactional SQL database engine. It's highly reliable and used in various applications, from embedded devices to web browsers. This article will guide you through creating a table in SQLite using both the sqlite3 and DbSchema tools.
2. Prerequisites
To follow along with this guide, you'll need the following:
- A basic understanding of SQL (Structured Query Language)
- SQLite installed on your system (sqlite3 tool for command line usage)
- DbSchema (A visual database design & management tool)
For installation and establishing connection you can read our article SQLite-How to create a database?
3. What is a Data Type?
A data type is an attribute that tells the type of data that a column can store in a database. It defines the kind of values that a column can accept. Different data types can include integers, decimal numbers, strings, dates, etc.
4. SQLite Data Types
In SQLite, data types are categorized into five storage classes:

| Storage Class | Description |
|---|---|
| NULL | The value is a NULL value. |
| INTEGER | The value is a signed integer, stored in 1, 2, 3, 4, 6, or 8 bytes depending on the magnitude. |
| REAL | The value is a floating point value, stored as an 8-byte IEEE floating point number. |
| TEXT | The value is a text string, stored using the database encoding (UTF-8, UTF-16BE or UTF-16LE). |
| BLOB | The value is a blob of data, stored exactly as it was input. |
Understanding Concept of Primary Key:
A primary key is a field or set of fields in a database table that uniquely identifies each record or row in the table. It ensures that each entry in the table has a unique identifier, which helps in identifying, retrieving, and manipulating specific records in the database.
Key Characteristics of Primary Key:
Here are some key characteristics of a primary key:
-
Uniqueness: Every value in the primary key column(s) must be unique. No two records can have the same primary key value.
-
Non-nullability: A primary key value cannot be NULL or empty. It must have a valid value for every record.
-
Immutable: The value of a primary key should not change over time. It provides a stable and reliable reference to a specific record.
-
Single value or combination: A primary key can be a single field or a combination of multiple fields (
composite key), depending on the requirements of the database. -
Indexing: The primary key is typically indexed, which helps improve the performance of searching, sorting, and joining operations on the table.
5. Creating a Table in SQLite3
Step 1: Start SQLite3
Firstly, you need to start SQLite3. Open your terminal or command line interface and type:
sqlite3
This will open the SQLite3 interactive shell.
Step 2: Create a New Database
Let's create a new database named "SchoolDB". To do this, use the .open command followed by the name of the database you want to create:
.open SchoolDB.db
This will create a new database file named "SchoolDB.db". If the file already exists, it will open the existing file.
To know more about creating a database you can read our article SQLite-How to create a database?
Result from Query:
Following is the result obtained by executing the query
| Seq | Name | File |
|---|---|---|
| 0 | main | /home/sqlite/SchoolDB.db |
Step 3: Create a New Table
To create a table in SQLite3, you use the CREATE TABLE statement. The general syntax is:
CREATE TABLE table_name (
   column1 datatype,
   column2 datatype,
   column3 datatype,
   .....
   columnN datatype,
   PRIMARY KEY(one or more columns)
);
Refer to the Understanding SQLite Data Types section if you need a reminder of the different data types.
Now, let's create a table named "Students". You can do this using the CREATE TABLE statement.
CREATE TABLE Students (
   StudentId INTEGER,
   FirstName TEXT,
   LastName TEXT,
   BirthDate TEXT,
   PRIMARY KEY(StudentId)
);
This command will create a new table named "Students" with columns for "StudentId", "FirstName", "LastName", and "BirthDate". The "StudentId" column is defined as the primary key.
Step 4: Verify the Table Creation
You can verify the creation of the table by listing all tables in the database with the .tables command:
.tables
If the "Students" table was created successfully, it should be listed in the output of this command.
Result from Query:
Following is the result obtained by executing the query
sqlite>.tables
Students
Step 5: Exit SQLite3
Once you're done with your database operations, you can exit the SQLite3 interactive shell using the .quit command:
.quit
This completes the process of creating a table in SQLite3.
6. Creating a Table in DbSchema
Creating a table in DbSchema involves the use of a graphical interface, which makes the process more intuitive and user-friendly.
- Launch DbSchema and create a new project. Connect to your SQLite database.
- Right-click anywhere on the Diagram and select 'Create Table'.
- A dialog will appear where you can set the table name (e.g., 'Students') and start defining columns with their names, data types, and constraints.
- After defining all the columns and constraints, click 'Apply' to create the table.
For our 'Students' table, you would define the same columns and data types as in the SQLite3 example.
Create Tables and Visually Manage SQLite using DbSchema
DbSchema is a SQLite client and visual designer. DbSchema has a free Community Edition, which can be downloaded here.
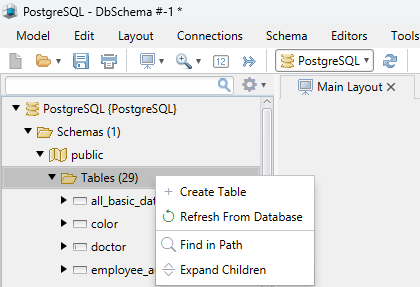
Create Table
Start the application and connect to the SQLite database. Right-click the table folder to create a table.
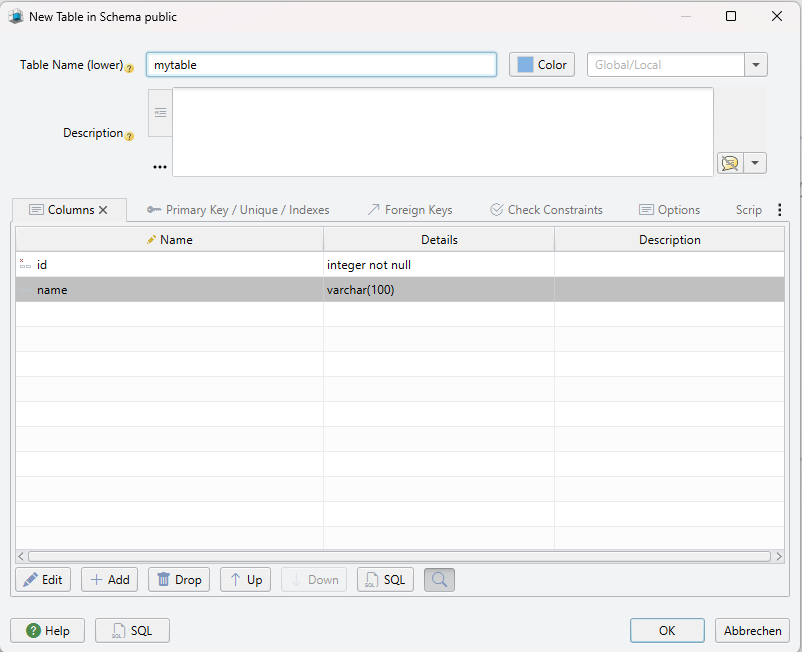
Add Table Columns
Add the columns to the table.
7. Conclusion
SQLite is a versatile database solution that supports multiple data types and allows for easy creation and management of tables, whether you're working directly with the sqlite3 tool or utilizing the DbSchema tool's graphical interface. Both methods have their unique advantages; sqlite3 commands offer a quick, scriptable solution, while DbSchema provides a more visually intuitive experience.
8. References
- SQLite Documentation: SQLite Datatypes
- SQLite Documentation: SQLite Create Table
- DbSchema Documentation: Create a Table