Sqite UNION Clause Explained with Examples

Table of Contents
- Introduction
- Prerequisites
- UNION Clause
- Advantages and Limitations of UNION Clause
- Restrictions on UNION Clause
- Difference between UNION Clause and UNION ALL Clause
- Implementing UNION in sqlite3
- Implementing UNION in DbSchema
- Conclusion
- References
Introduction
SQLite is a widely used relational database management system that employs SQL (Structured Query Language). This article explores the use of the UNION clause in SQLite, specifically within the sqlite3 and DbSchema environments. The UNION operator allows the combination of two or more SELECT statements into a single result set, providing that each SELECT statement contains the same number of columns and similar data types.
Prerequisites
Before you proceed, ensure that you have:
- SQLite installed on your machine. You can download it from the official SQLite website.
- DbSchema installed. Download it from the DbSchema website.
- Basic knowledge of SQL syntax.
For installation and establishing connection you can read our article SQLite-How to create a database?
UNION Clause
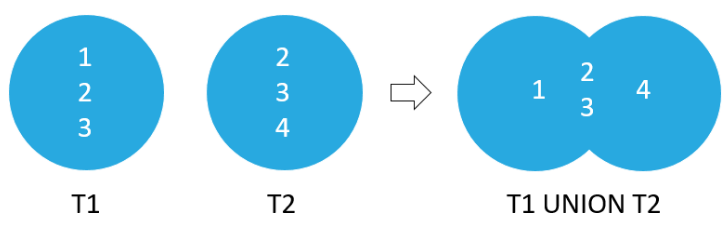
In SQLite, the UNION clause combines the result sets of two or more SELECT statements into a single result set. The UNION operator removes duplicate rows from the result.
Advantages and Limitations of UNION Clause
Advantages
- It allows the combination of results from multiple SELECT statements into a single comprehensive result.
- It removes duplicate entries, ensuring that the final result is unique.
Limitations
- The UNION operator can be slower compared to individual SELECT statements, especially on large datasets, because it needs to remove duplicate entries.
- All SELECT statements within the UNION must have the same number of columns and corresponding data types.
Restrictions on UNION Clause
- The number of columns and their data types must be the same in all the SELECT statements being united.
- The column names in the result set are usually determined by the column names in the first SELECT statement.
Difference between UNION Clause and UNION ALL Clause
| UNION Clause | UNION ALL Clause |
|---|---|
| Removes duplicate rows from the result. | Does not remove duplicate rows from the result. |
| May be slower due to the process of removing duplicates. | Faster, as it does not need to process removing duplicates. |
Implementing UNION in sqlite3
Here's how you can implement the UNION operator in sqlite3:
Step 1: Install sqlite3
If you haven't already, you need to install sqlite3 on your machine. You can download it from the official SQLite website.
Step 2: Start sqlite3
To start sqlite3, open your terminal and type sqlite3. You will then see the sqlite3 command-line interface.
sqlite3
Step 3: Create a New Database
To create a new database, type the following command:
.open sampleDB.db
To know more about creating a database you can read our article SQLite-How to create a database?
Step 4: Create the Tables and Insert Data
Next, let's create two tables, Employees and Contractors, and insert some data into them.
CREATE TABLE Employees (
  id INTEGER PRIMARY KEY,
  name TEXT,
  department TEXT
);

INSERT INTO Employees (name, department) VALUES
('John Doe', 'Sales'),
('Jane Doe', 'Marketing');

CREATE TABLE Contractors (
  id INTEGER PRIMARY KEY,
  name TEXT,
  department TEXT
);

INSERT INTO Contractors (name, department) VALUES
('Mark Smith', 'Sales'),
('Jane Smith', 'Marketing');
To know more about creating a table you can read our article SQLite-How to create a Table?
Step 5: Implement UNION
Now that we have some data in our tables, we can implement the UNION operator.
SELECT name, department FROM Employees
 UNION
SELECT name, department FROM Contractors;
Sample Database:
Employees Table:
| name | department |
|---|---|
| John Doe | Sales |
| Jane Doe | Marketing |
Contractors Table:
| name | department |
|---|---|
| Mark Smith | Sales |
| Jane Smith | Marketing |
Results:
Following result will be obtained after executing UNION Clause:
| name | department |
|---|---|
| John Doe | Sales |
| Jane Doe | Marketing |
| Mark Smith | Sales |
| Jane Smith | Marketing |
Step 6: Implement UNION ALL
Now we will implement UNION ALL clause on our sample database.
SELECT name, department FROM Employees
UNION ALL
SELECT name, department FROM Contractors;
Results:
Following result will be obtained after executing UNION ALL Clause:
| name | department |
|---|---|
| John Doe | Sales |
| Jane Doe | Marketing |
| Mark Smith | Sales |
| Jane Smith | Marketing |
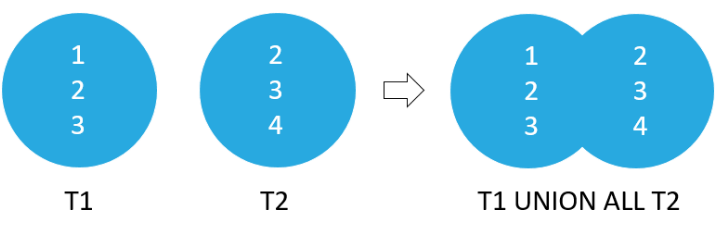
Notice that if there were duplicate records between the Employees and Contractors tables, UNION ALL would have included them in the result.
Implementing UNION in DbSchema
Step 1: Install DbSchema
If you haven't already, you need to install DbSchema on your machine. You can download it from the official DbSchema website.
Step 2: Connect to Your SQLite Database
After you open DbSchema, you need to connect it to your SQLite database. You can do this by clicking on Connect to database and filling in the necessary details.
Step 3: Create the Tables and Insert Data
Next, let's create the Employees and Contractors tables and insert some data into them. You can do this in the 'SQL Editor'.
To know more about creating a table you can read our article SQLite-How to create a Table?
Step 4: Implement UNION
Finally, we can implement the UNION operator. You can do this in the SQL Editor as well.
SELECT name, department FROM Employees
UNION
SELECT name, department FROM Contractors;
After you run the query, you can see the results in the 'Query Results' tab.
Visually Manage SQLite using DbSchema
DbSchema is a SQLite client and visual designer. DbSchema has a free Community Edition, which can be downloaded here.
Key Features of DbSchema:
Following are the key features of DbSchema which distinguish it from other database GUI tools.
Conclusion
The UNION operator is a powerful tool in SQL that allows you to combine the results of multiple SELECT statements. However, it does have certain limitations and should be used carefully. While the implementation of the UNION operator is pretty standard across different SQL environments, the specific way to do it may vary slightly.