DbSchema | SQL Server - How to Use Distributed Transactions?
SQL Server: How to Use Distributed Transactions in sqlcmd and DbSchema
![]()
Table of Contents
- Introduction
- What are Distributed Transactions
- Purpose of Using Distributed Transactions
- Permissions and Restrictions on Using Distributed Transactions
- Types of Distributed Transactions
- How to Use Distributed Transactions in sqlcmd and DbSchema
- Conclusion
- References
Introduction
In this article, we will delve into the realm of SQL Server and explore distributed transactions, their types, how to use them in sqlcmd and DbSchema, and the permissions and restrictions associated with them.
Before we proceed, it’s important to note that the information provided in this article assumes that the reader has a basic understanding of SQL Server, sqlcmd utility, and DbSchema.
Prerequisites
Before you proceed, you should have the following:
- SQL Server installed on your machine
- A basic understanding of SQL Server
- Familiarity with sqlcmd utility and DbSchema
- Basic knowledge of SQL
For installation and establishing connection you can read our article SQL Server-How to create a database?
What are Distributed Transactions
Distributed transactions are operations that include one or more network-hosted databases. These transactions involve multiple tasks that must be executed in multiple databases, often located on different servers, and maintain data consistency across all the involved databases. Each of these tasks might be dependent on the others in the same transaction. If any task fails, all tasks in the transaction are rolled back.
Purpose of Using Distributed Transactions
Distributed transactions play a crucial role in maintaining data consistency and integrity across multiple databases in different locations. They allow you to perform a set of tasks as a single work unit across multiple databases, ensuring that either all tasks are completed successfully or none at all.
Permissions and Restrictions on Using Distributed Transactions
To manage distributed transactions, you must have the appropriate permissions set on the SQL Server.
Permissions:
- To initiate a distributed transaction, you need permission to execute the BEGIN DISTRIBUTED TRANSACTION statement.
- To commit a distributed transaction, the user must have the COMMIT permission.
- To roll back a distributed transaction, the user must have the ROLLBACK permission.
Restrictions:
- You can’t nest distributed transactions. That is, you can’t start a new distributed transaction inside an existing one.
- A distributed transaction can’t be initiated from a trigger or a stored procedure.
Types of Distributed Transactions
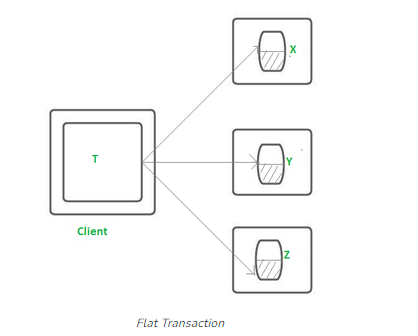
Flat Distributed Transactions
In a flat distributed transaction, all operations are part of a single transaction, and the commit of the transaction is atomic, meaning that either all operations are committed or none at all. If any operation fails, the entire transaction is rolled back.
Example:
BEGIN DISTRIBUTED TRANSACTION;

UPDATE DB1.dbo.Table1 SET column1 = value1 WHERE column2 = value2;
UPDATE DB2.dbo.Table2 SET column1 = value1 WHERE column2 = value2;

COMMIT;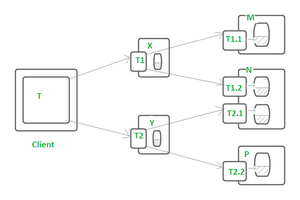
Nested Distributed Transactions
SQL Server does not directly support nested distributed transactions. However, it supports savepoints within distributed transactions that allow you to roll back a part of a distributed transaction.
Example:
BEGIN DISTRIBUTED TRANSACTION;

SAVE TRANSACTION SP1;

UPDATE DB1.dbo.Table1 SET column1 = value1 WHERE column2 = value2;

SAVE TRANSACTION SP2;

UPDATE DB2.dbo.Table2 SET column1 = value1 WHERE column2 = value2;

ROLLBACK TRANSACTION SP1;

COMMIT;
How to Use Distributed Transactions in sqlcmd and DbSchema
In this section, we’ll walk through a detailed explanation of using distributed transactions in sqlcmd and DbSchema, supplemented with examples involving sample database tables.
Using sqlcmd
Open a command prompt: Use the search bar on your computer and type cmd. Click on the command prompt application to open it.
Connect to your SQL Server instance using sqlcmd: This is the command you will need to type in your command prompt (replace localhost, username, and password with your actual SQL Server details):
sqlcmd -S localhost -U username -P passwordStart the distributed transaction: Use the BEGIN DISTRIBUTED TRANSACTION; command to initiate your distributed transaction.
Execute your SQL commands: You will need to execute commands that span multiple databases. For example, suppose we have two databases, DB1 and DB2, and they each contain a table, Products and Sales, respectively.
Here’s an example of a distributed transaction that modifies data in both databases:
BEGIN DISTRIBUTED TRANSACTION;
UPDATE DB1.dbo.Products SET Price = Price * 1.10 WHERE Category = 'Electronics';
UPDATE DB2.dbo.Sales SET TotalAmount = TotalAmount * 1.10 WHERE ProductCategory = 'Electronics';
COMMIT;
End the transaction: To conclude the transaction, use the COMMIT; command. If for any reason you want to abort the transaction, use the ROLLBACK; command.
After executing the queries, the price of all electronic products in the Products table of DB1 and the TotalAmount of all sales of electronic products in the Sales table of DB2 will increase by 10%.
Results from the Query:
Let’s consider the previous example:
The Products table in DB1 before the transaction:
| ProductID | Category | Price |
|---|---|---|
| 1 | Electronics | 100 |
| 2 | Apparel | 50 |
| 3 | Electronics | 200 |
The Sales table in DB2 before the transaction:
| SalesID | ProductCategory | TotalAmount |
|---|---|---|
| 1 | Electronics | 100 |
| 2 | Apparel | 50 |
| 3 | Electronics | 200 |
After executing the distributed transaction, which increased the prices of all electronic products by 10% in both databases, the tables would look as follows:
The Products table in DB1 after the transaction:
| ProductID | Category | Price |
|---|---|---|
| 1 | Electronics | 110 |
| 2 | Apparel | 50 |
| 3 | Electronics | 220 |
The Sales table in DB2 after the transaction:
| SalesID | ProductCategory | TotalAmount |
|---|---|---|
| 1 | Electronics | 110 |
| 2 | Apparel | 50 |
| 3 | Electronics | 220 |
As you can see, only the rows where the category was ‘Electronics’ were updated, demonstrating the execution of the distributed transaction.
Using DbSchema
Launch DbSchema and connect to your SQL Server instance: You can do this by clicking on the Connect button on the toolbar.
Open the SQL Editor: Once you’re connected to your database, click on SQL Editor in the toolbar to open the SQL Editor.
Enter your SQL commands: You will need to start, execute, and end your distributed transaction here. For example:
BEGIN DISTRIBUTED TRANSACTION;
UPDATE DB1.dbo.Products SET Price = Price * 1.10 WHERE Category = 'Electronics';
UPDATE DB2.dbo.Sales SET TotalAmount = TotalAmount * 1.10 WHERE ProductCategory = 'Electronics';
COMMIT;
Execute the SQL commands: Click on the Execute (F5) button to run the SQL commands.
Again, after running these commands, the price of all electronic products in the Products table of DB1 and the TotalAmount of all sales of electronic products in the Sales table of DB2 will increase by 10%.
Remember that while using distributed transactions, you need to ensure that all the commands inside the transaction maintain data integrity across all involved databases. If any command fails, you should roll back the entire transaction to avoid inconsistent data across your databases.
Conclusion
Distributed transactions are a powerful tool for maintaining data consistency across multiple databases in SQL Server. By leveraging the sqlcmd utility and DbSchema, we can easily manage these transactions, ensuring atomicity and data integrity.